# Performing Instance Segmentation on X-Ray Images with Mask R-CNN
**COVID-19 or novel coronavirus disease**, which has already been declared as a **Worldwide pandemic**, at first had an outbreak in a small town of China, named **Wuhan**. More than two hundred countries around the world have already been affected by this severe virus as it spreads by human interaction.
Moreover, the symptoms of novel coronavirus are quite similar to the general flu. Screening of infected patients is considered as a critical step in the fight against COVID-19\. Therefore, it is highly relevant to recognize positive cases as early as possible to avoid further spreading of this epidemic. However, there are several methods to detect COVID-19 positive patients, which are typically performed based on respiratory samples and among them one of the critical approach which is treated as radiology imaging or X-Ray imaging. **Recent findings from X-Ray imaging techniques suggest that such images contain relevant information about the SARS-CoV-2 virus.**
* * *
# Introduction
**Deep learning** is a popular area of research in the field of artificial intelligence. It enables end-to-end modelling to deliver promised results using input data without the need for manual feature extraction. The use of **Machine Learning methods** for diagnostics in the medical field has recently gained popularity as a complementary tool for doctors. Due to this, in recent times, many radiological images have been extensively used to detect COVID-19 confirmed cases.
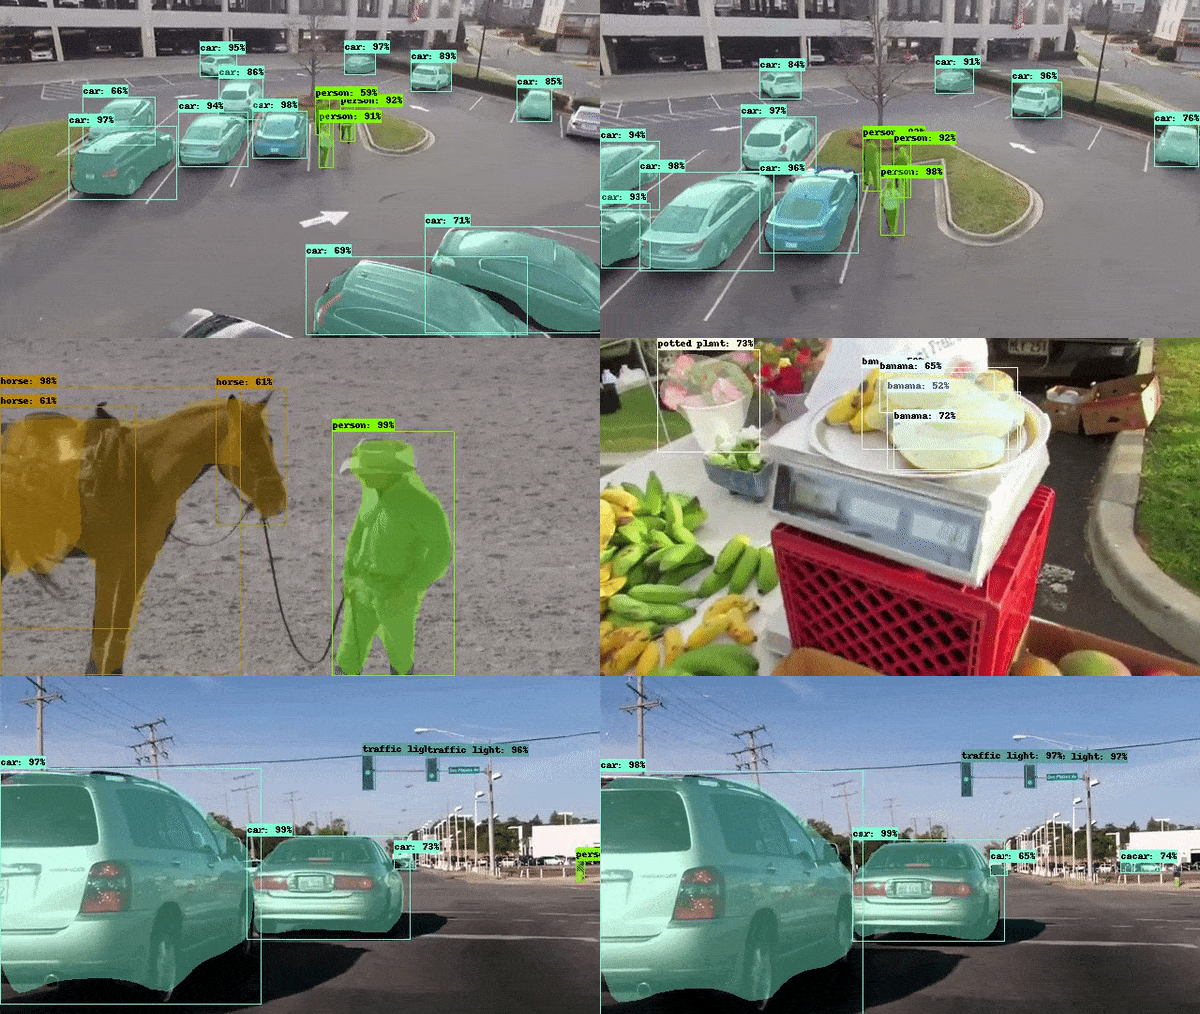
**Mask RCNN** is a conceptually **simple, flexible, and general framework** for **object instance segmentation**. The approach efficiently detects objects in an image while simultaneously generating a high-quality segmentation mask for each instance. This method extends **Faster R-CNN** by adding a branch for predicting an object mask in parallel with the existing branch for bounding box recognition. Mask R-CNN is simple to train and adds only a small overhead to Faster R-CNN, running at 5 fps. Moreover, it is easy to generalize to other tasks.
* * *
# Understanding Image Segmentation
**Image segmentation** is the process of partitioning a digital image into multiple segments. The goal of segmentation is to simplify and/or change the representation of an image into something that is more meaningful and easier to analyze.
**Image segmentation** is typically used to locate objects and boundaries (lines, curves, etc.) in images. More precisely, Image Segmentation is the process of assigning a label to every pixel in an image such that pixels with the same label share certain characteristics.
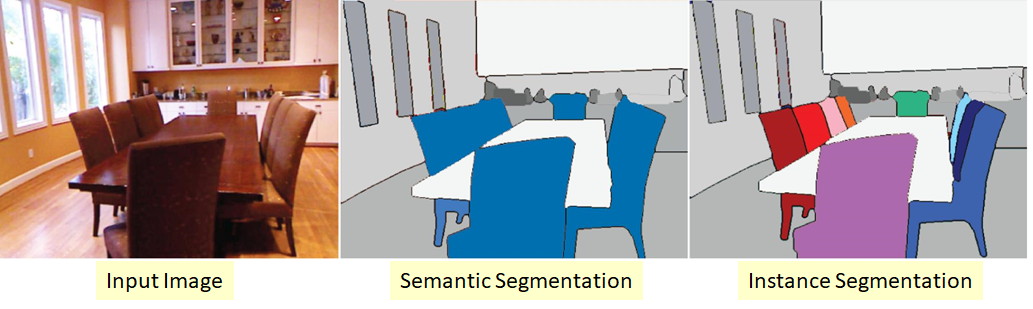
There are 2 types of Image Segmentation- **Instance Segmentation** and **Semantic Segmentation**.
* * *
# Related Works
**Sethy** classified the properties obtained from different models of CNN with the **SVM Classifier** using X-Ray images. Besides, **Wang** suggested a Deep model for COVID19 patients recognition and achieved an accuracy of **92.4%** in the classification of standard classes, non-COVID, and COVID-19 Pneumonia. In another study, a **ResNet5026** model was proposed by **Narin**, and it achieved a COVID-19 detection accuracy of **98%**. In terms of COVID-19 patients detection using X-Ray images, the Deep model of **Ioannis** reached a success rate of **98.75%** for two classes and **93.48%** for three classes. By comprising multiple CNN models, **Hemdan** has proposed a **COVIDX-Net model** that is capable of detecting confirmed cases of COVID-19\. A transfer learning-based framework has been advised by **Karmany** to identify medical diagnoses and treatable diseases using image-based deep learning.
* * *
# Understanding Ground Glass Opacity in X-Rays
The COVID-19 pandemic has brought radiologists’ penchant for descriptive terms front-and-centre, with frequent references to one feature in particular: **ground-glass opacities.**
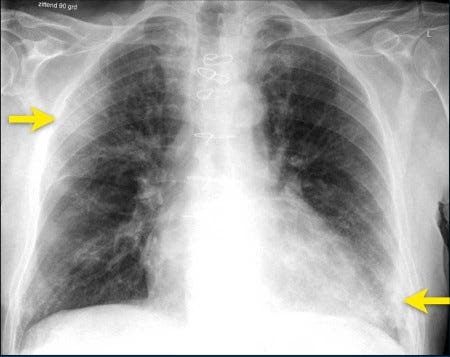
The term refers to the **hazy, white-flecked pattern** seen on lung CT scans, indicative of increased density. It’s not quite as dense as the “[crazy-paving](https://radiopaedia.org/articles/crazy-paving?lang=us)” pattern, which looks like a mosaic or pavers, and less confounding than the “[head cheese sign](https://radiopaedia.org/articles/head-cheese-sign-lungs?lang=us),” a juxtaposition of three or more densities present in the same lung.
Ground-glass opacities aren’t likely to be found in healthy lungs, though, and wouldn’t result from exposures like air pollution or smoking. There are a lot of diseases that can cause ground-glass opacities, but in COVID-19, there’s a distinct distribution, a preference for certain parts of the lung. COVID-related ground-glass opacities also have a very round shape that’s unusual compared with other ground-glass opacities.
* * *
# Technologies Used
## Supervisely
> “Supervisely is a powerful platform for computer vision development, where individual researchers and large teams can annotate and experiment with datasets and neural networks.”
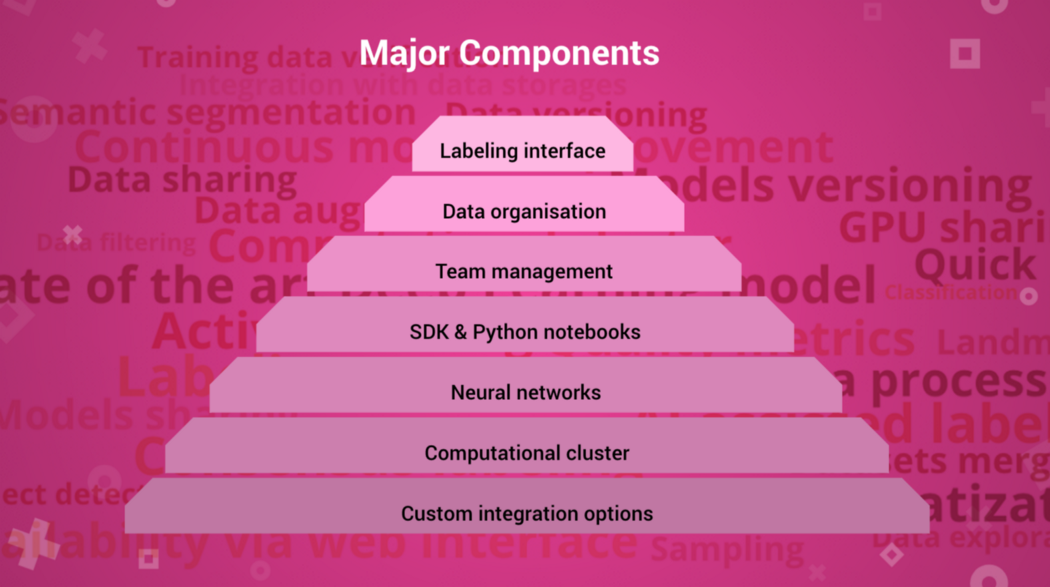
Supervisely provides the following advantages:
* **Get from idea to a toy prototype in several minutes.** It will take you 5 minutes to manually label 10 images, run data preparation script, train and apply the model.
* **Leverage the largest Deep Learning models collection available.** You can use Deep Learning models in a unified, framework-independent way. So the experiments are fast and cheap, it’s easy to compare the performance of different models on your task.
* **Fast iterations.** Active learning to improve your models continuously is a huge benefit to our platform.
* **Get ready-to-use ecosystems.** Organizing workflow of data annotators, reviewers, data scientists and domain experts in a way that results are sharable and available with the emphasis on fast iterations usually implies creating complex front-end/back-end infrastructure that we provide out of the box.
* * *
# Getting Started
## Requisites
We should have an active **AWS** account to connect our Supervisely account to an instance for training. We should know how to start an **AMI Linux Instance** there and install the software in it.
* * *
# Working with Supervisely
First, we need to create an account in **Supervisely**. After creating the account, we need to create a **Workspace** and a **team**.
## 1\. Uploading the dataset of Images
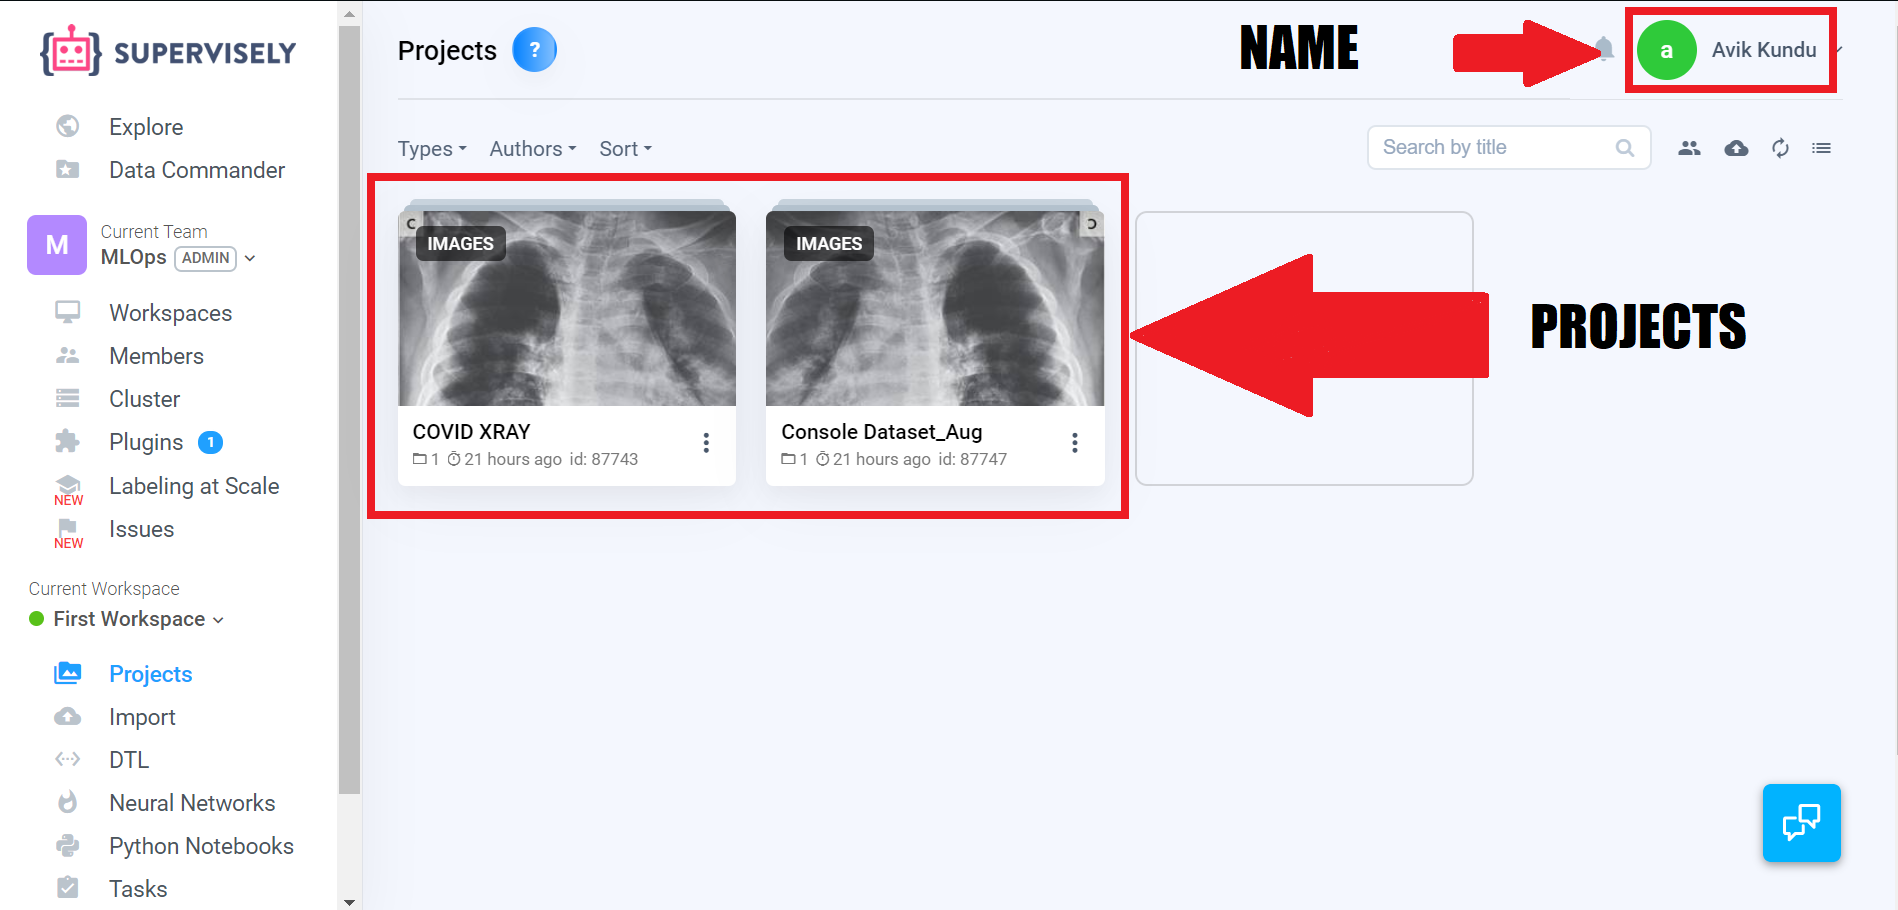
Then we need to create a **Project**. Inside the Project, we upload the dataset or images.

## 2\. Annotating all Uploaded Images
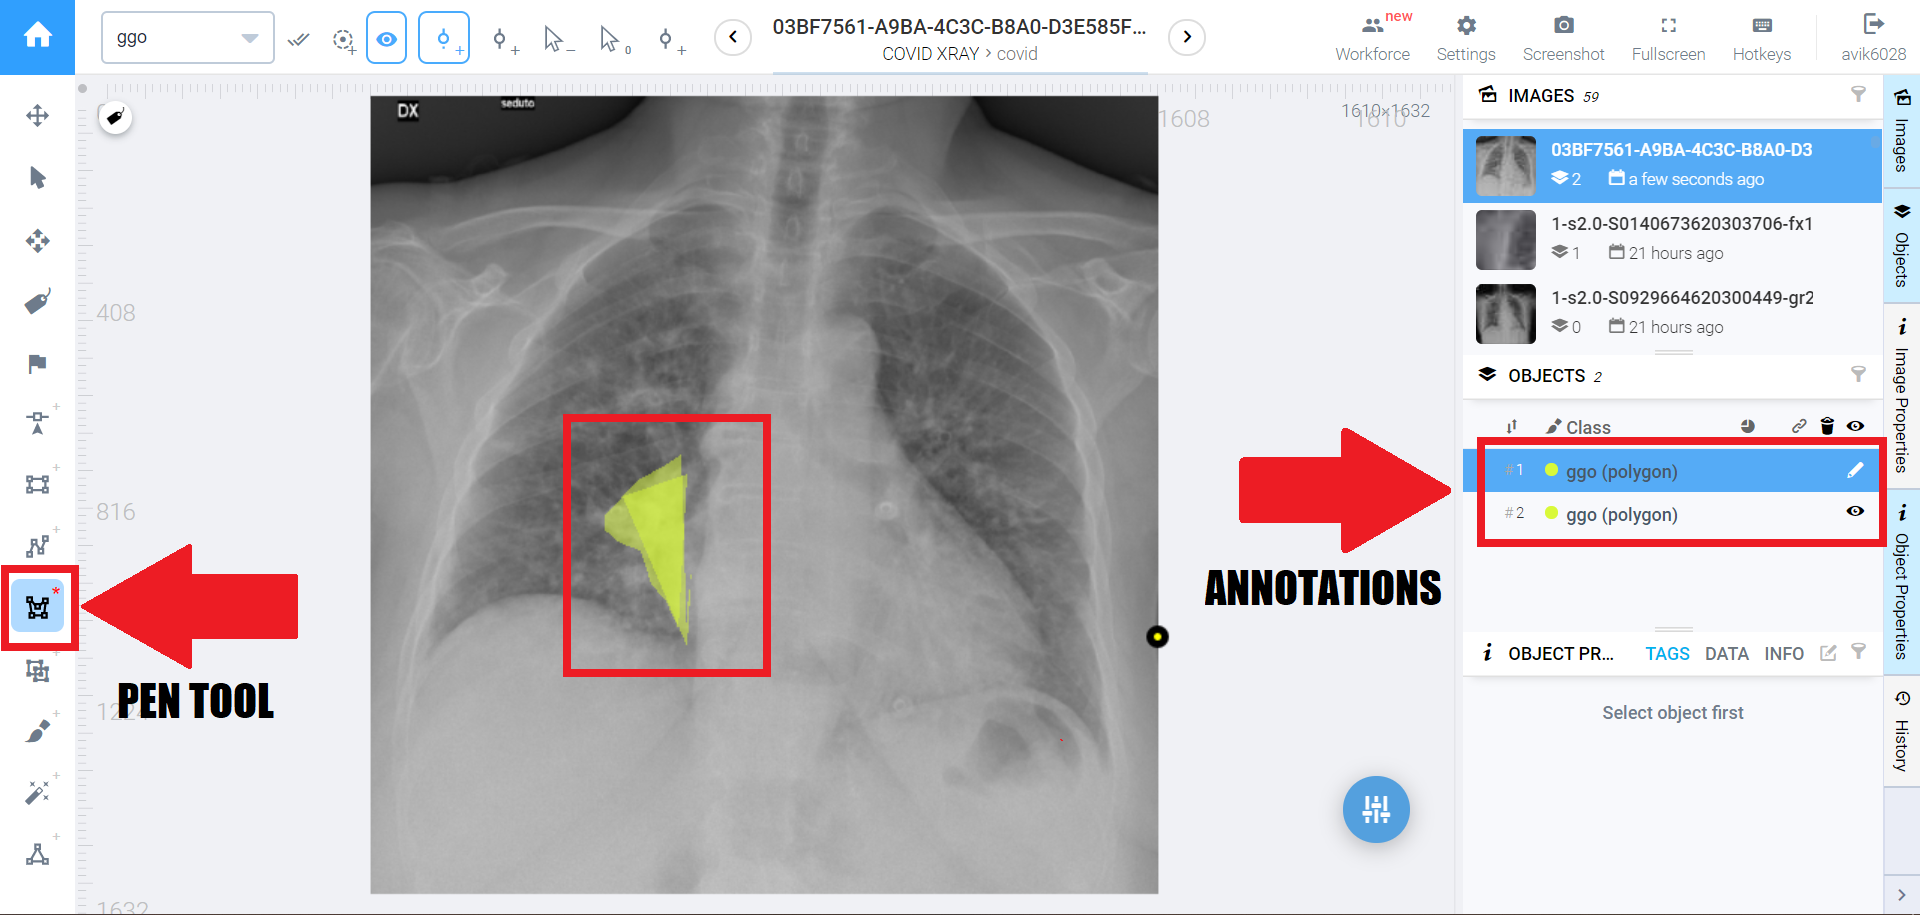
After creating the project and uploading the images, we need to **annotate** the images, **so that our model knows what exactly to look in the images**.
## 3\. Performing Data Augmentation
After annotation, we need to increase the number of images available in our dataset for getting accurate results. For this, we use a **DTL code** which would perform some necessary changes in our image to create some new versions of it. Some of the techniques we use are: rotating, increasing or decreasing contrast or the brightness of our images to create the new versions.
For this, We need to upload a DTL code shown below:
After completing up to this, we will find another folder automatically created which contains at least 4 times the images we originally provided.
## 5\. Connecting to EC2 Instance to train the model
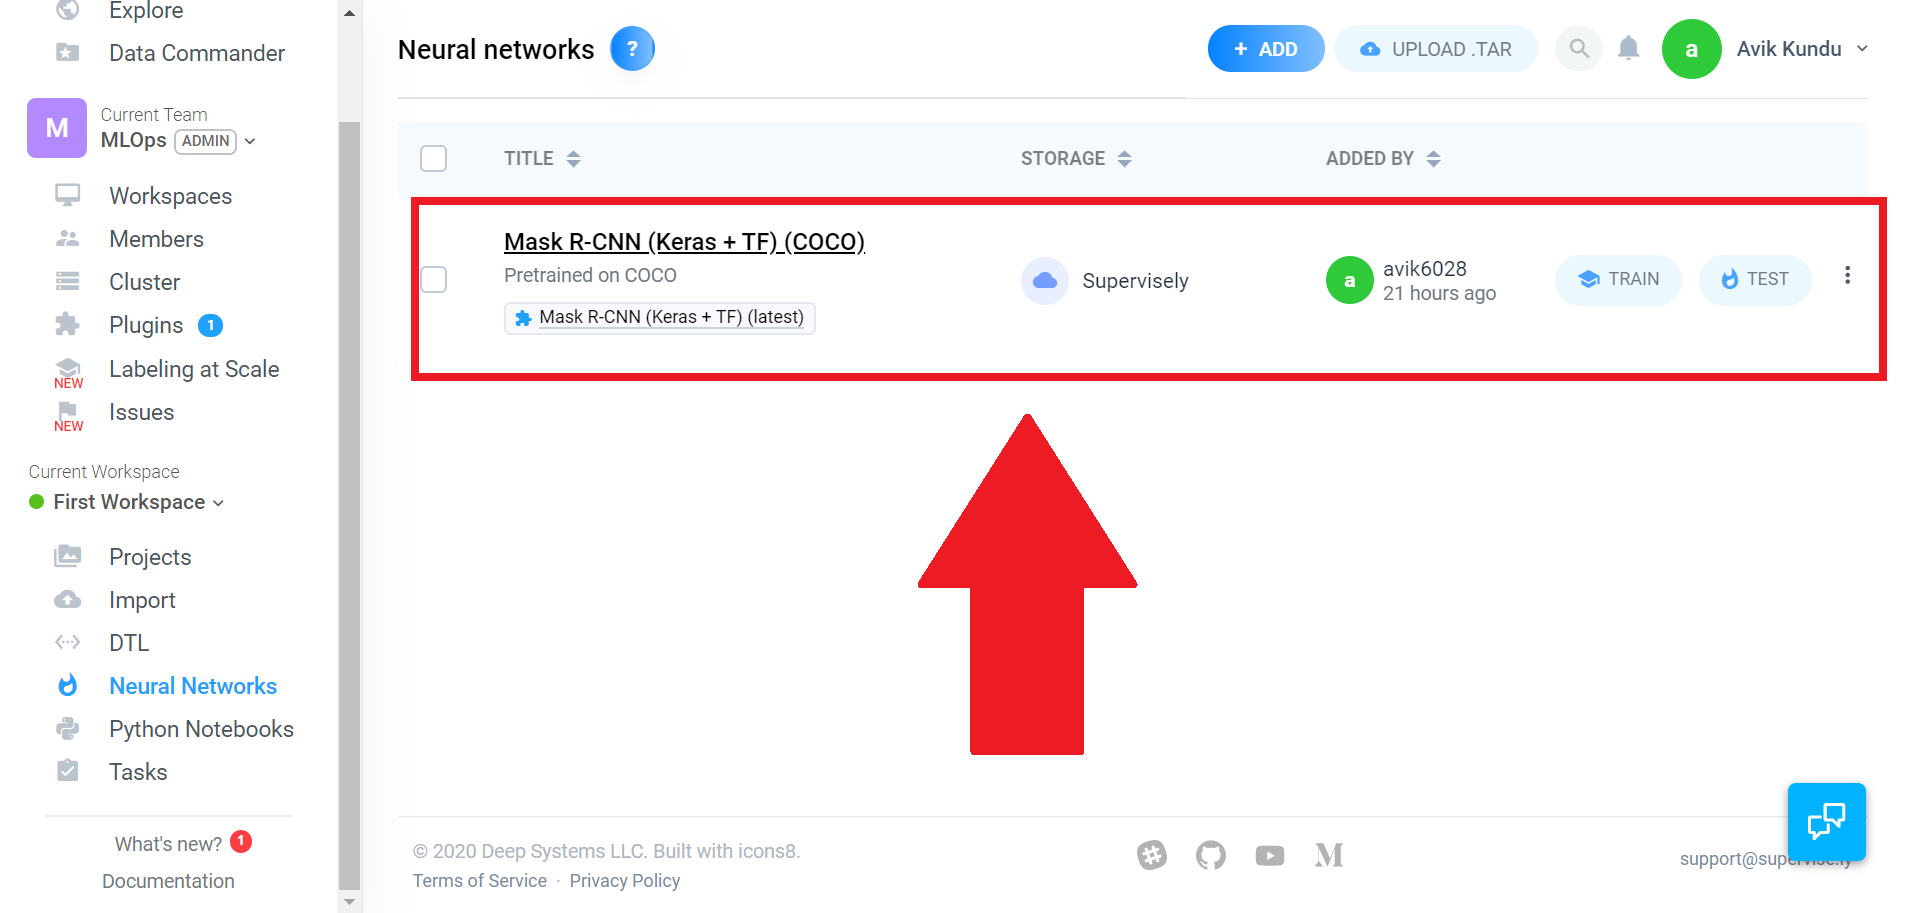
Now we need to select a **Neural Network** model from the list for training. In our case, we are going to use the **Mask RCNN model**.
Now is the time when we need to create an instance in AWS and connect it with the **Supervisely** to perform the training operations.
The pre-requisite for an instance by default set by **Supervisely** includes having a GPU. But since GPU are costly and we have to request AWS for increasing the limit, we will just train our model and download the weight file. After that, we would manually run the weight file in our local machine to view the output.
In AWS, we run an **Amazon Linux** instance and connect it with our local machine via **ssh**. After that, we install Docker inside the instance since Supervisely needs **Docker** as it will automatically download a Docker image of the program which will perform the training.
After we install Docker in the instance, we need to connect Supervisely with the instance, using the highlighted Bash Script.
This will download the Supervisely Docker image in our Instance. All the requires dependencies required for training our model are packaged in this Docker image.
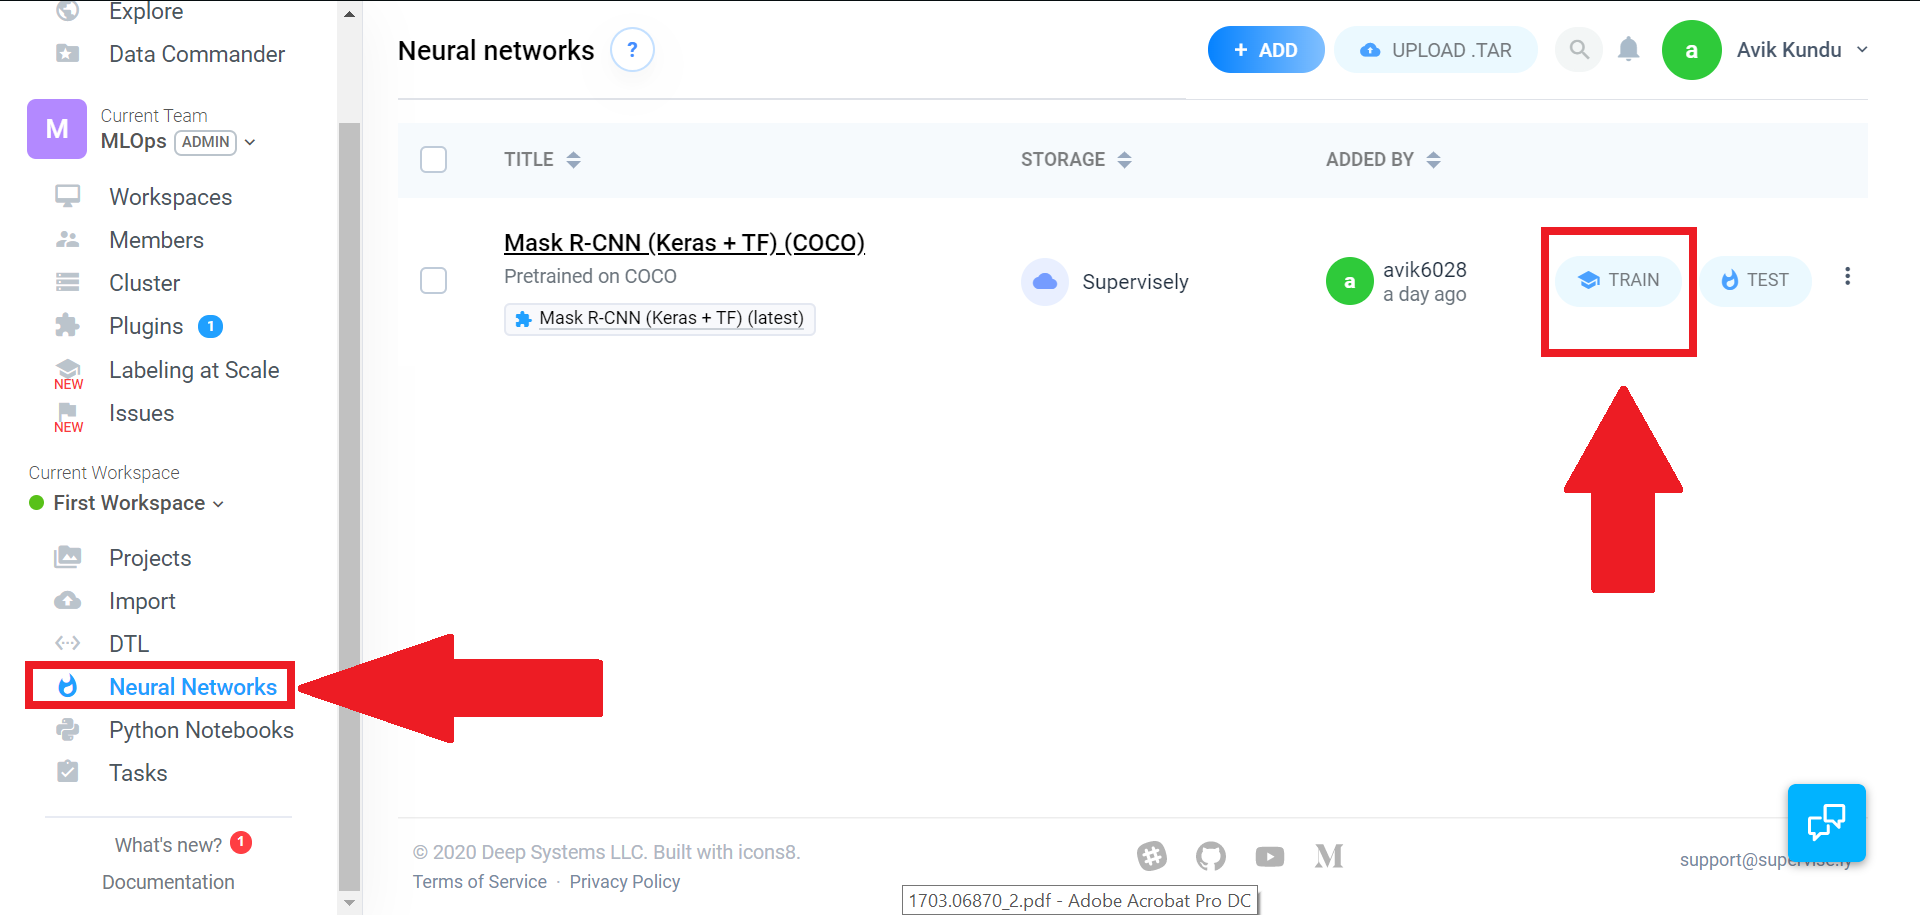
After this, from the Neural Networks tab, we start the Training Process of our model.
Since we don't have any GPU in our instance, we would find this error:
But, we can still download the weights file in the following way:
## 6\. Finding the Output
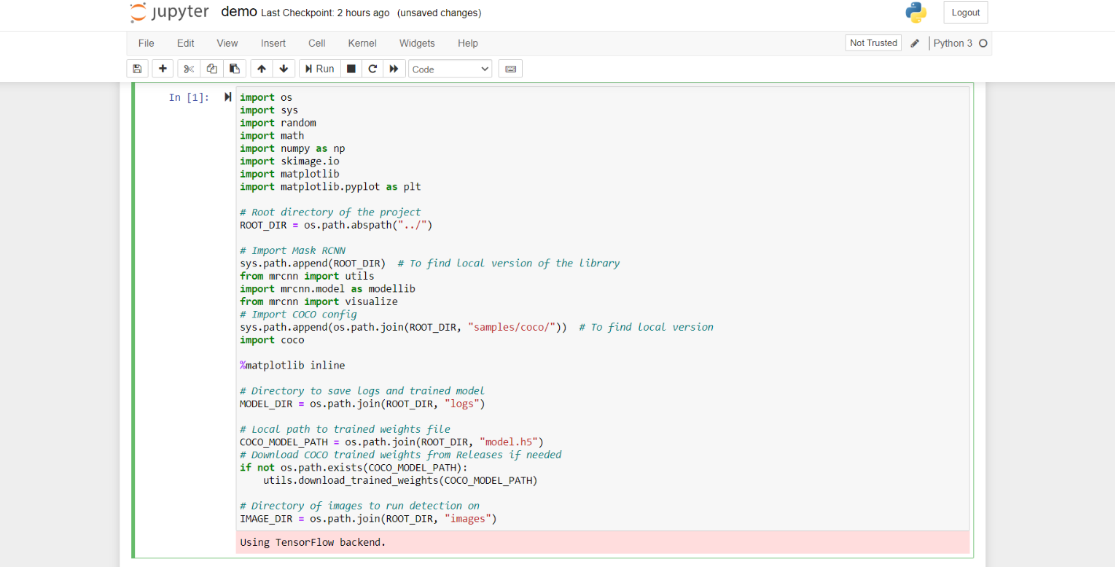
After downloading the weights file, we update the Mask RCNN demo code available at Matterplot Repository accordingly to accept this weight file.
* * *
# Conclusion
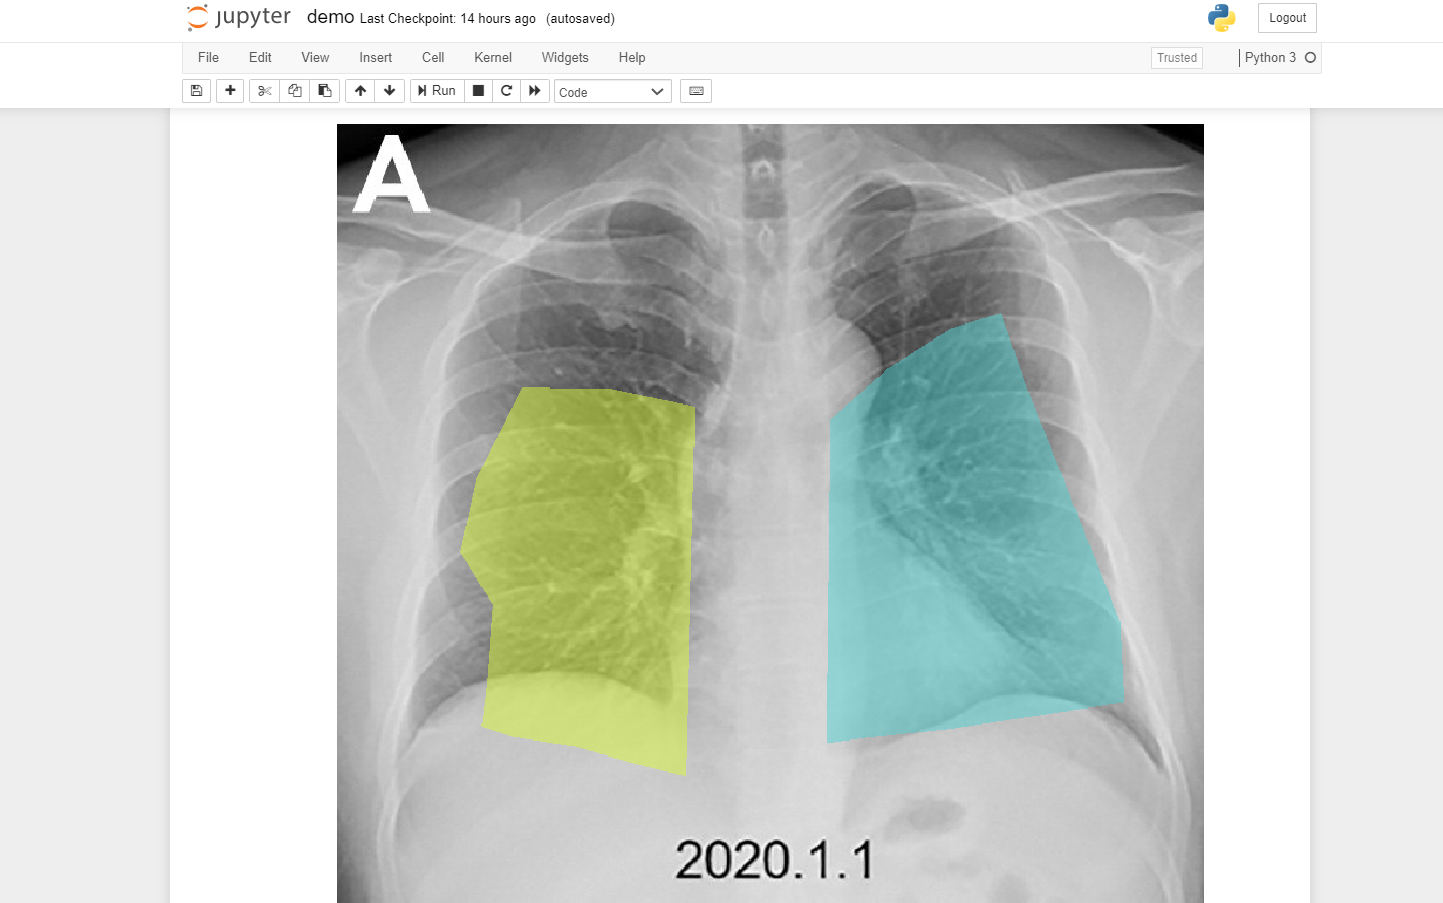
Thus by the above process, we were able to perform instance segmentation on COVID Chest X-Rays. Our model confirmed that the X-ray provided was having **Ground Glass Opacities,** which in turn predicted that the associated person might be infected.
By more proper annotations on the training images, we can increase the accuracy of the model so that it can mask the exact area of the GGOs in the future. Moreover, we can provide a powerful remote instance having GPUs, which can automate the entire process remotely, rather than testing the weights manually.
* * *
You can reach out on my [GitHub](https://github.com/Lucifergene/), [Twitter](https://twitter.com/avik6028), [Instagram](https://instagram.com/avik6028), or on [LinkedIn](https://linkedin.com/in/avik-kundu-0b837715b) if you need more help. I would be more than happy.
If you have come up to this, **do drop an 👏 if you liked this article.**
**Good Luck** 😎 and **happy coding** 👨💻
 **Mask RCNN** is a conceptually **simple, flexible, and general framework** for **object instance segmentation**. The approach efficiently detects objects in an image while simultaneously generating a high-quality segmentation mask for each instance. This method extends **Faster R-CNN** by adding a branch for predicting an object mask in parallel with the existing branch for bounding box recognition. Mask R-CNN is simple to train and adds only a small overhead to Faster R-CNN, running at 5 fps. Moreover, it is easy to generalize to other tasks.
* * *
# Understanding Image Segmentation
**Image segmentation** is the process of partitioning a digital image into multiple segments. The goal of segmentation is to simplify and/or change the representation of an image into something that is more meaningful and easier to analyze.
**Image segmentation** is typically used to locate objects and boundaries (lines, curves, etc.) in images. More precisely, Image Segmentation is the process of assigning a label to every pixel in an image such that pixels with the same label share certain characteristics.
There are 2 types of Image Segmentation- **Instance Segmentation** and **Semantic Segmentation**.
**Mask RCNN** is a conceptually **simple, flexible, and general framework** for **object instance segmentation**. The approach efficiently detects objects in an image while simultaneously generating a high-quality segmentation mask for each instance. This method extends **Faster R-CNN** by adding a branch for predicting an object mask in parallel with the existing branch for bounding box recognition. Mask R-CNN is simple to train and adds only a small overhead to Faster R-CNN, running at 5 fps. Moreover, it is easy to generalize to other tasks.
* * *
# Understanding Image Segmentation
**Image segmentation** is the process of partitioning a digital image into multiple segments. The goal of segmentation is to simplify and/or change the representation of an image into something that is more meaningful and easier to analyze.
**Image segmentation** is typically used to locate objects and boundaries (lines, curves, etc.) in images. More precisely, Image Segmentation is the process of assigning a label to every pixel in an image such that pixels with the same label share certain characteristics.
There are 2 types of Image Segmentation- **Instance Segmentation** and **Semantic Segmentation**.
 * * *
# Related Works
**Sethy** classified the properties obtained from different models of CNN with the **SVM Classifier** using X-Ray images. Besides, **Wang** suggested a Deep model for COVID19 patients recognition and achieved an accuracy of **92.4%** in the classification of standard classes, non-COVID, and COVID-19 Pneumonia. In another study, a **ResNet5026** model was proposed by **Narin**, and it achieved a COVID-19 detection accuracy of **98%**. In terms of COVID-19 patients detection using X-Ray images, the Deep model of **Ioannis** reached a success rate of **98.75%** for two classes and **93.48%** for three classes. By comprising multiple CNN models, **Hemdan** has proposed a **COVIDX-Net model** that is capable of detecting confirmed cases of COVID-19\. A transfer learning-based framework has been advised by **Karmany** to identify medical diagnoses and treatable diseases using image-based deep learning.
* * *
# Understanding Ground Glass Opacity in X-Rays
The COVID-19 pandemic has brought radiologists’ penchant for descriptive terms front-and-centre, with frequent references to one feature in particular: **ground-glass opacities.**
* * *
# Related Works
**Sethy** classified the properties obtained from different models of CNN with the **SVM Classifier** using X-Ray images. Besides, **Wang** suggested a Deep model for COVID19 patients recognition and achieved an accuracy of **92.4%** in the classification of standard classes, non-COVID, and COVID-19 Pneumonia. In another study, a **ResNet5026** model was proposed by **Narin**, and it achieved a COVID-19 detection accuracy of **98%**. In terms of COVID-19 patients detection using X-Ray images, the Deep model of **Ioannis** reached a success rate of **98.75%** for two classes and **93.48%** for three classes. By comprising multiple CNN models, **Hemdan** has proposed a **COVIDX-Net model** that is capable of detecting confirmed cases of COVID-19\. A transfer learning-based framework has been advised by **Karmany** to identify medical diagnoses and treatable diseases using image-based deep learning.
* * *
# Understanding Ground Glass Opacity in X-Rays
The COVID-19 pandemic has brought radiologists’ penchant for descriptive terms front-and-centre, with frequent references to one feature in particular: **ground-glass opacities.**
 The term refers to the **hazy, white-flecked pattern** seen on lung CT scans, indicative of increased density. It’s not quite as dense as the “[crazy-paving](https://radiopaedia.org/articles/crazy-paving?lang=us)” pattern, which looks like a mosaic or pavers, and less confounding than the “[head cheese sign](https://radiopaedia.org/articles/head-cheese-sign-lungs?lang=us),” a juxtaposition of three or more densities present in the same lung.
Ground-glass opacities aren’t likely to be found in healthy lungs, though, and wouldn’t result from exposures like air pollution or smoking. There are a lot of diseases that can cause ground-glass opacities, but in COVID-19, there’s a distinct distribution, a preference for certain parts of the lung. COVID-related ground-glass opacities also have a very round shape that’s unusual compared with other ground-glass opacities.
* * *
# Technologies Used
## Supervisely
> “Supervisely is a powerful platform for computer vision development, where individual researchers and large teams can annotate and experiment with datasets and neural networks.”
The term refers to the **hazy, white-flecked pattern** seen on lung CT scans, indicative of increased density. It’s not quite as dense as the “[crazy-paving](https://radiopaedia.org/articles/crazy-paving?lang=us)” pattern, which looks like a mosaic or pavers, and less confounding than the “[head cheese sign](https://radiopaedia.org/articles/head-cheese-sign-lungs?lang=us),” a juxtaposition of three or more densities present in the same lung.
Ground-glass opacities aren’t likely to be found in healthy lungs, though, and wouldn’t result from exposures like air pollution or smoking. There are a lot of diseases that can cause ground-glass opacities, but in COVID-19, there’s a distinct distribution, a preference for certain parts of the lung. COVID-related ground-glass opacities also have a very round shape that’s unusual compared with other ground-glass opacities.
* * *
# Technologies Used
## Supervisely
> “Supervisely is a powerful platform for computer vision development, where individual researchers and large teams can annotate and experiment with datasets and neural networks.”
 Supervisely provides the following advantages:
* **Get from idea to a toy prototype in several minutes.** It will take you 5 minutes to manually label 10 images, run data preparation script, train and apply the model.
* **Leverage the largest Deep Learning models collection available.** You can use Deep Learning models in a unified, framework-independent way. So the experiments are fast and cheap, it’s easy to compare the performance of different models on your task.
* **Fast iterations.** Active learning to improve your models continuously is a huge benefit to our platform.
* **Get ready-to-use ecosystems.** Organizing workflow of data annotators, reviewers, data scientists and domain experts in a way that results are sharable and available with the emphasis on fast iterations usually implies creating complex front-end/back-end infrastructure that we provide out of the box.
* * *
# Getting Started
## Requisites
We should have an active **AWS** account to connect our Supervisely account to an instance for training. We should know how to start an **AMI Linux Instance** there and install the software in it.
* * *
# Working with Supervisely
First, we need to create an account in **Supervisely**. After creating the account, we need to create a **Workspace** and a **team**.
## 1\. Uploading the dataset of Images
Then we need to create a **Project**. Inside the Project, we upload the dataset or images.
Supervisely provides the following advantages:
* **Get from idea to a toy prototype in several minutes.** It will take you 5 minutes to manually label 10 images, run data preparation script, train and apply the model.
* **Leverage the largest Deep Learning models collection available.** You can use Deep Learning models in a unified, framework-independent way. So the experiments are fast and cheap, it’s easy to compare the performance of different models on your task.
* **Fast iterations.** Active learning to improve your models continuously is a huge benefit to our platform.
* **Get ready-to-use ecosystems.** Organizing workflow of data annotators, reviewers, data scientists and domain experts in a way that results are sharable and available with the emphasis on fast iterations usually implies creating complex front-end/back-end infrastructure that we provide out of the box.
* * *
# Getting Started
## Requisites
We should have an active **AWS** account to connect our Supervisely account to an instance for training. We should know how to start an **AMI Linux Instance** there and install the software in it.
* * *
# Working with Supervisely
First, we need to create an account in **Supervisely**. After creating the account, we need to create a **Workspace** and a **team**.
## 1\. Uploading the dataset of Images
Then we need to create a **Project**. Inside the Project, we upload the dataset or images.
 

 ## 2\. Annotating all Uploaded Images
After creating the project and uploading the images, we need to **annotate** the images, **so that our model knows what exactly to look in the images**.
## 2\. Annotating all Uploaded Images
After creating the project and uploading the images, we need to **annotate** the images, **so that our model knows what exactly to look in the images**.
 ## 3\. Performing Data Augmentation
After annotation, we need to increase the number of images available in our dataset for getting accurate results. For this, we use a **DTL code** which would perform some necessary changes in our image to create some new versions of it. Some of the techniques we use are: rotating, increasing or decreasing contrast or the brightness of our images to create the new versions.
## 3\. Performing Data Augmentation
After annotation, we need to increase the number of images available in our dataset for getting accurate results. For this, we use a **DTL code** which would perform some necessary changes in our image to create some new versions of it. Some of the techniques we use are: rotating, increasing or decreasing contrast or the brightness of our images to create the new versions.
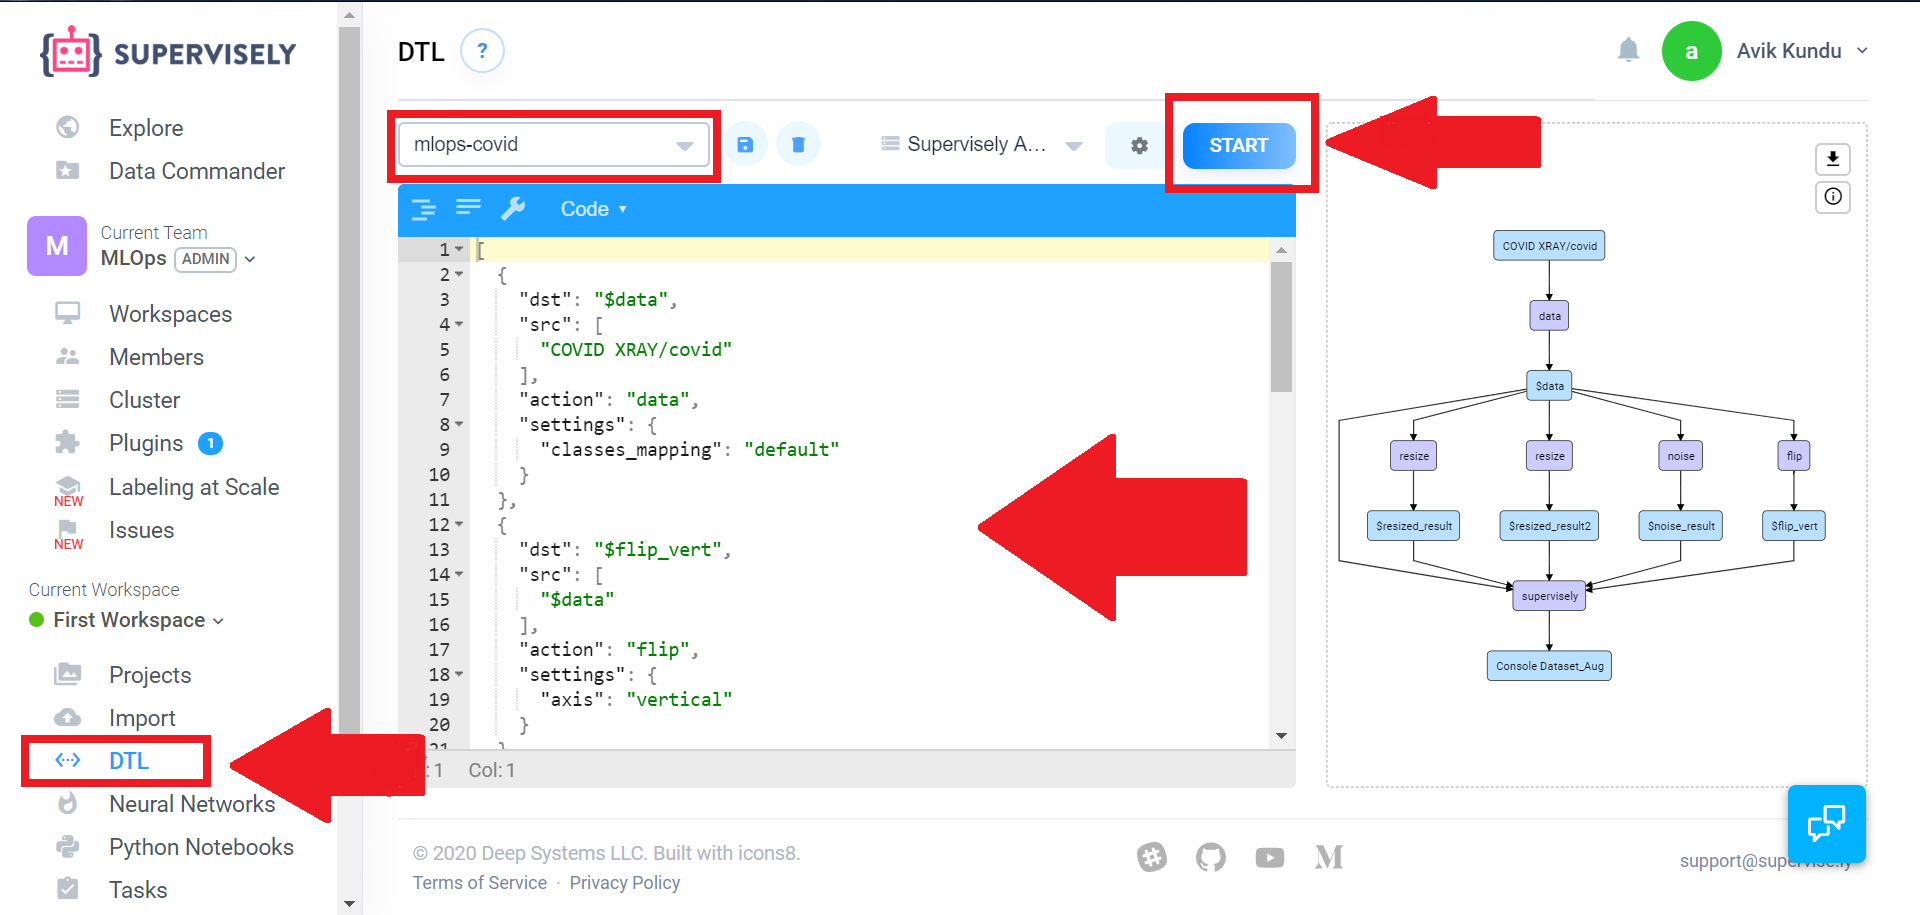 For this, We need to upload a DTL code shown below:
After completing up to this, we will find another folder automatically created which contains at least 4 times the images we originally provided.
## 5\. Connecting to EC2 Instance to train the model
Now we need to select a **Neural Network** model from the list for training. In our case, we are going to use the **Mask RCNN model**.
For this, We need to upload a DTL code shown below:
After completing up to this, we will find another folder automatically created which contains at least 4 times the images we originally provided.
## 5\. Connecting to EC2 Instance to train the model
Now we need to select a **Neural Network** model from the list for training. In our case, we are going to use the **Mask RCNN model**.
 Now is the time when we need to create an instance in AWS and connect it with the **Supervisely** to perform the training operations.
The pre-requisite for an instance by default set by **Supervisely** includes having a GPU. But since GPU are costly and we have to request AWS for increasing the limit, we will just train our model and download the weight file. After that, we would manually run the weight file in our local machine to view the output.
In AWS, we run an **Amazon Linux** instance and connect it with our local machine via **ssh**. After that, we install Docker inside the instance since Supervisely needs **Docker** as it will automatically download a Docker image of the program which will perform the training.
Now is the time when we need to create an instance in AWS and connect it with the **Supervisely** to perform the training operations.
The pre-requisite for an instance by default set by **Supervisely** includes having a GPU. But since GPU are costly and we have to request AWS for increasing the limit, we will just train our model and download the weight file. After that, we would manually run the weight file in our local machine to view the output.
In AWS, we run an **Amazon Linux** instance and connect it with our local machine via **ssh**. After that, we install Docker inside the instance since Supervisely needs **Docker** as it will automatically download a Docker image of the program which will perform the training.
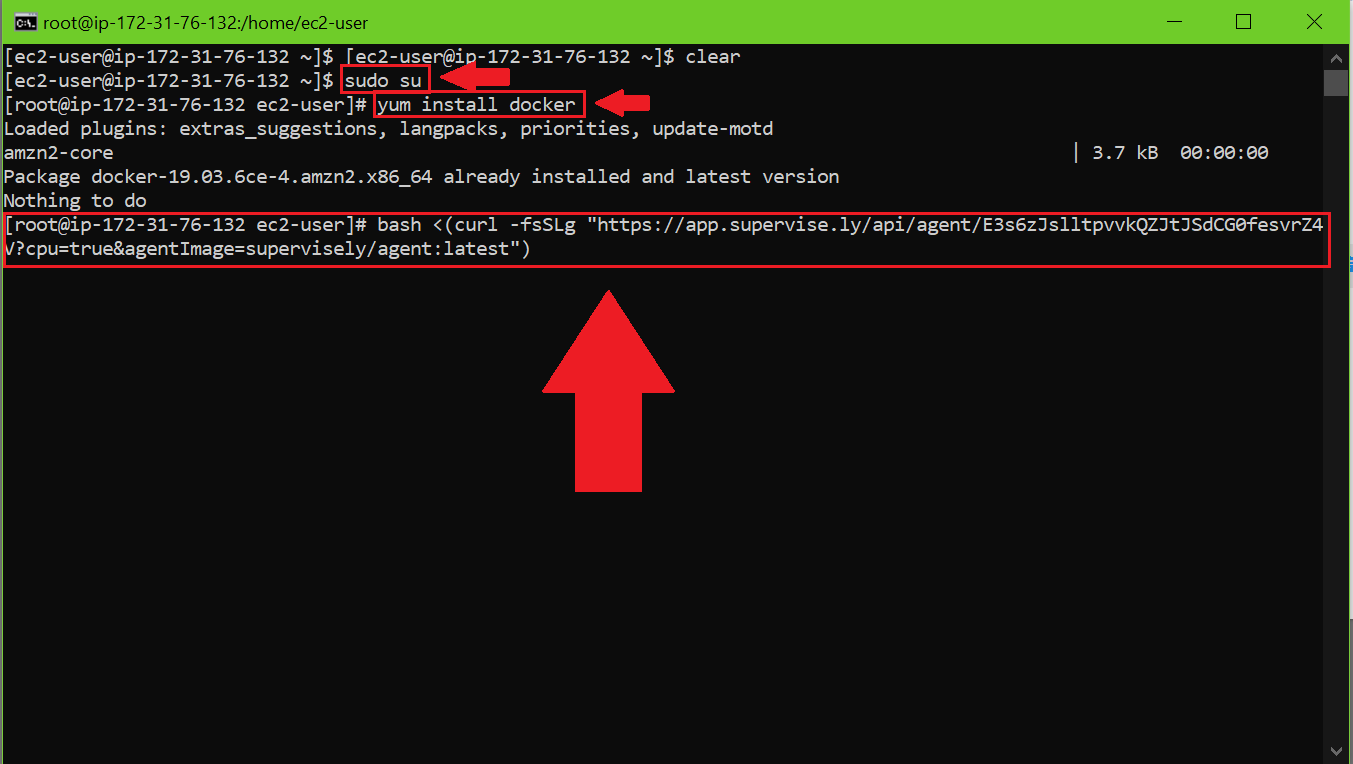 After we install Docker in the instance, we need to connect Supervisely with the instance, using the highlighted Bash Script.
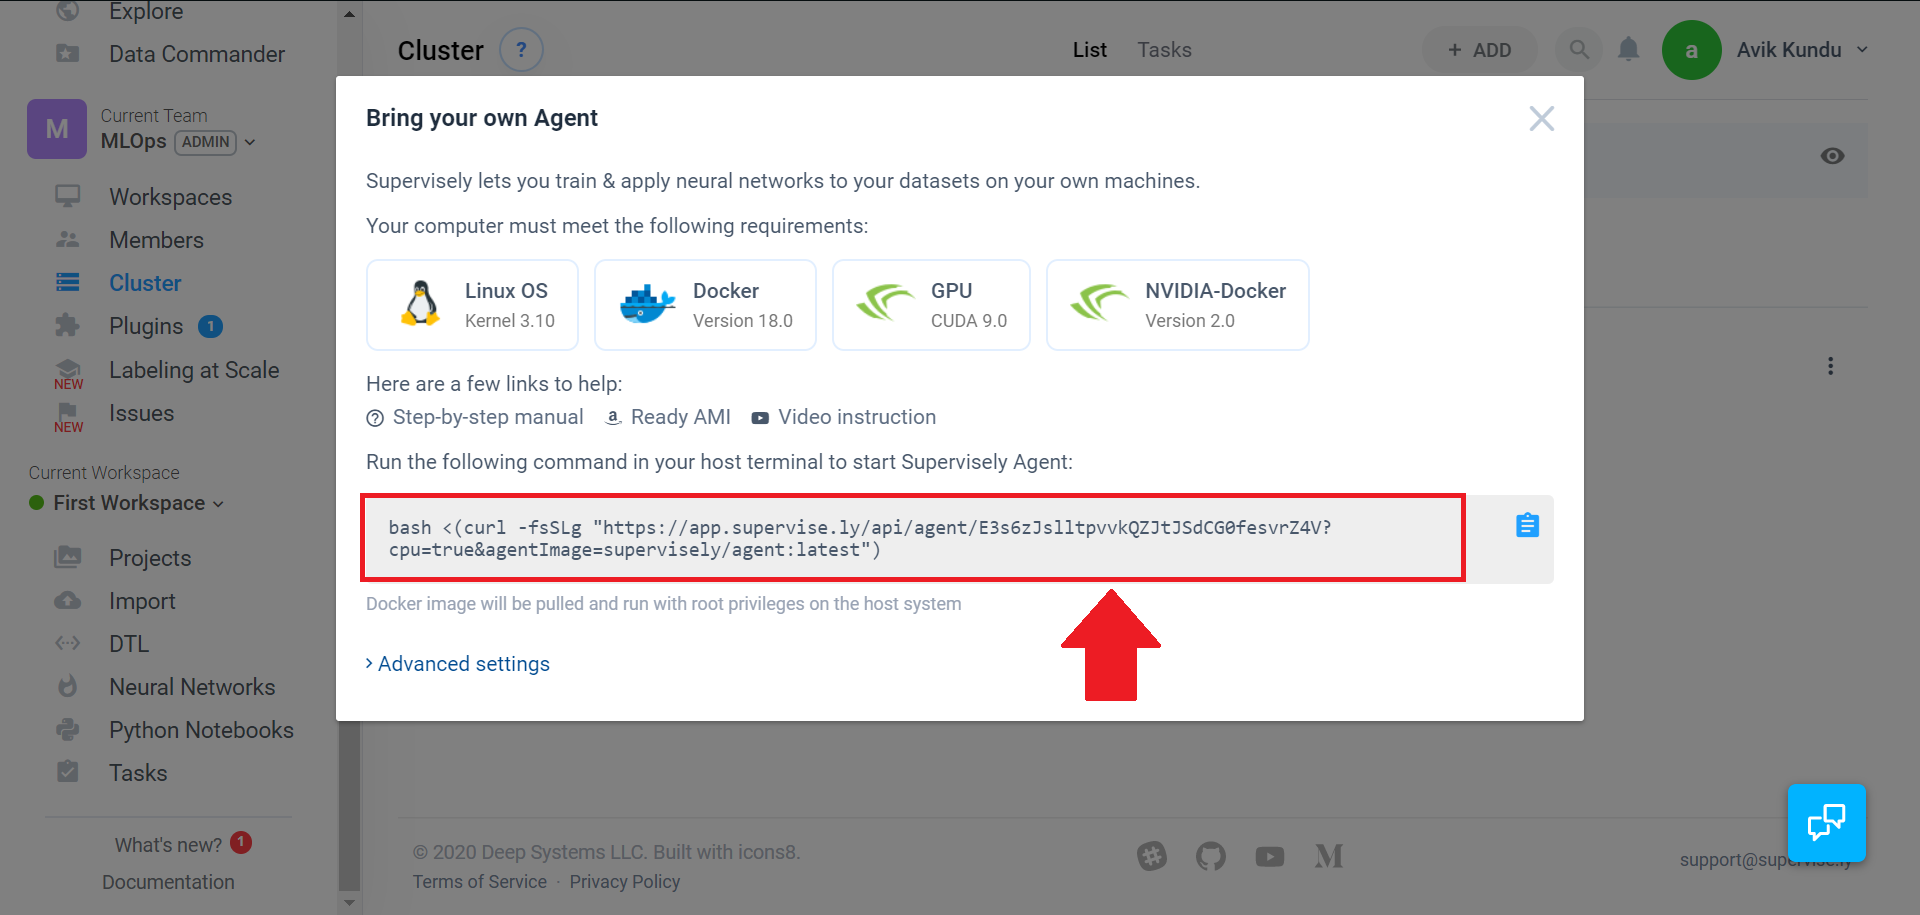 This will download the Supervisely Docker image in our Instance. All the requires dependencies required for training our model are packaged in this Docker image.
After this, from the Neural Networks tab, we start the Training Process of our model.
This will download the Supervisely Docker image in our Instance. All the requires dependencies required for training our model are packaged in this Docker image.
After this, from the Neural Networks tab, we start the Training Process of our model.
 Since we don't have any GPU in our instance, we would find this error:
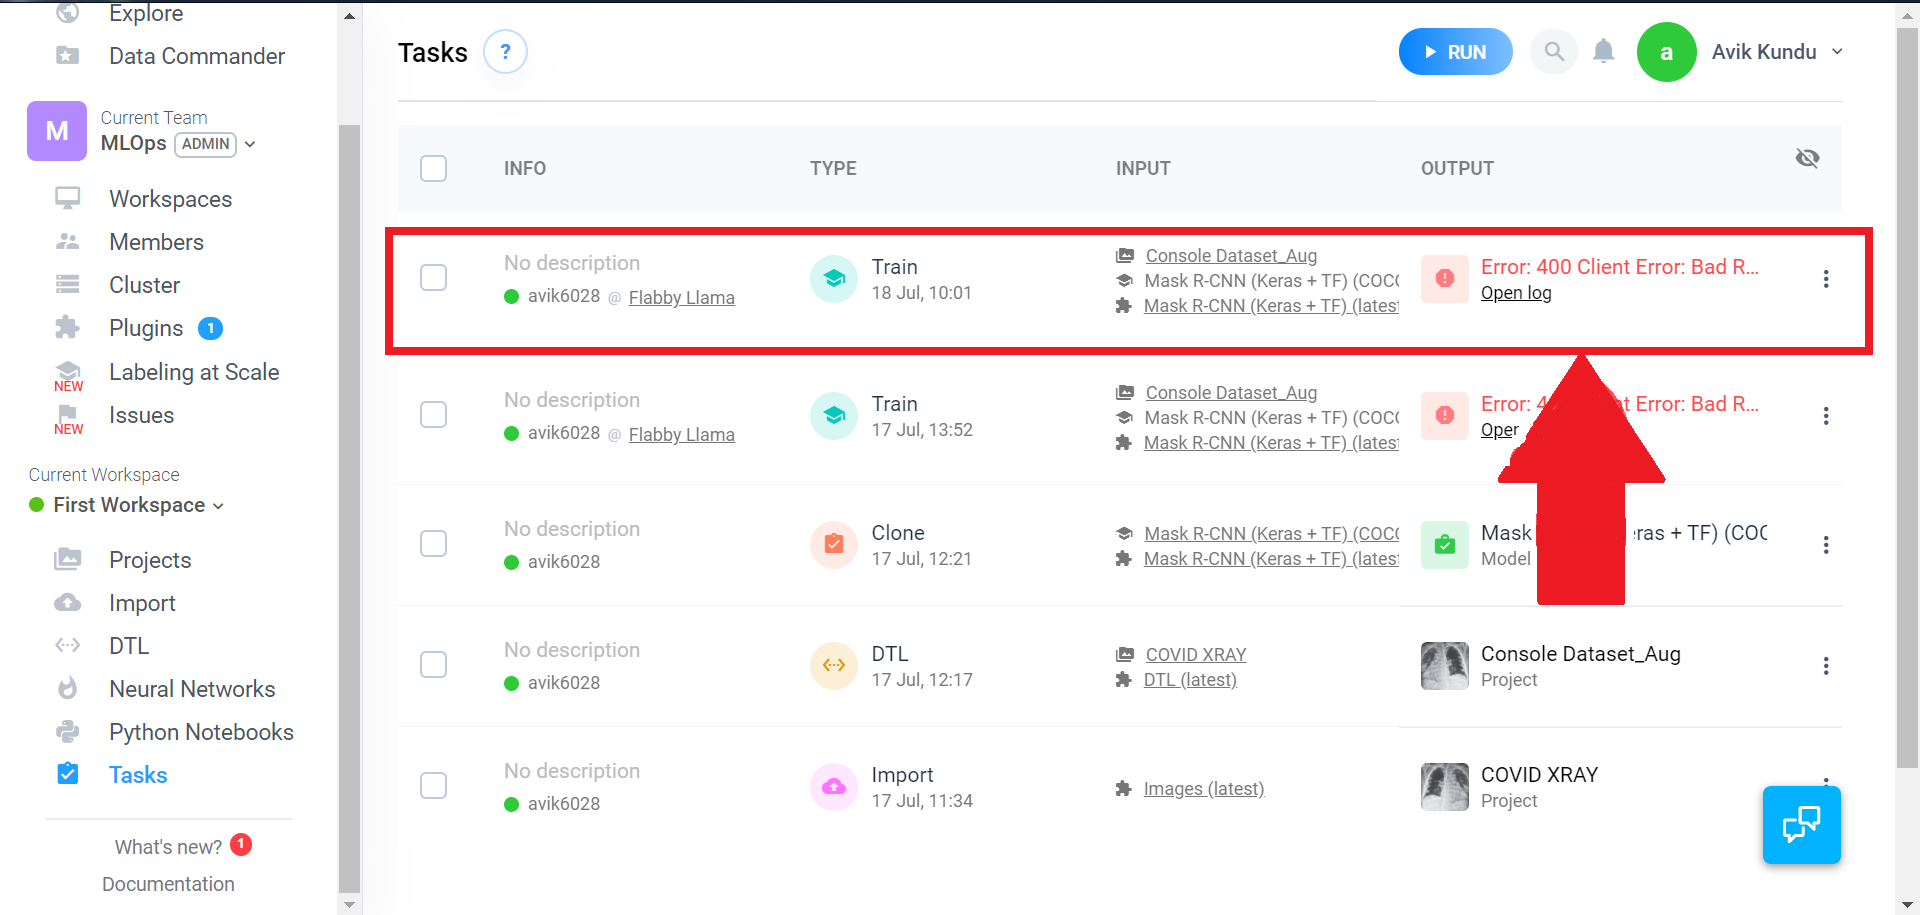 But, we can still download the weights file in the following way:
 ## 6\. Finding the Output
After downloading the weights file, we update the Mask RCNN demo code available at Matterplot Repository accordingly to accept this weight file.
## 6\. Finding the Output
After downloading the weights file, we update the Mask RCNN demo code available at Matterplot Repository accordingly to accept this weight file.
 * * *
# Conclusion
Thus by the above process, we were able to perform instance segmentation on COVID Chest X-Rays. Our model confirmed that the X-ray provided was having **Ground Glass Opacities,** which in turn predicted that the associated person might be infected.
By more proper annotations on the training images, we can increase the accuracy of the model so that it can mask the exact area of the GGOs in the future. Moreover, we can provide a powerful remote instance having GPUs, which can automate the entire process remotely, rather than testing the weights manually.
* * *
You can reach out on my [GitHub](https://github.com/Lucifergene/), [Twitter](https://twitter.com/avik6028), [Instagram](https://instagram.com/avik6028), or on [LinkedIn](https://linkedin.com/in/avik-kundu-0b837715b) if you need more help. I would be more than happy.
If you have come up to this, **do drop an 👏 if you liked this article.**
**Good Luck** 😎 and **happy coding** 👨💻
* * *
# Conclusion
Thus by the above process, we were able to perform instance segmentation on COVID Chest X-Rays. Our model confirmed that the X-ray provided was having **Ground Glass Opacities,** which in turn predicted that the associated person might be infected.
By more proper annotations on the training images, we can increase the accuracy of the model so that it can mask the exact area of the GGOs in the future. Moreover, we can provide a powerful remote instance having GPUs, which can automate the entire process remotely, rather than testing the weights manually.
* * *
You can reach out on my [GitHub](https://github.com/Lucifergene/), [Twitter](https://twitter.com/avik6028), [Instagram](https://instagram.com/avik6028), or on [LinkedIn](https://linkedin.com/in/avik-kundu-0b837715b) if you need more help. I would be more than happy.
If you have come up to this, **do drop an 👏 if you liked this article.**
**Good Luck** 😎 and **happy coding** 👨💻