# Building the Perfect Face Recognition Model with the Integration of ML-Ops
**Face recognition models** have been in the markets for decades now. It all started with the **Eigenface Approach** in the late ’80s to early ’90s. The Eigenface method is today used as a basis of many deep learning algorithms, paving way for modern facial recognition solutions.
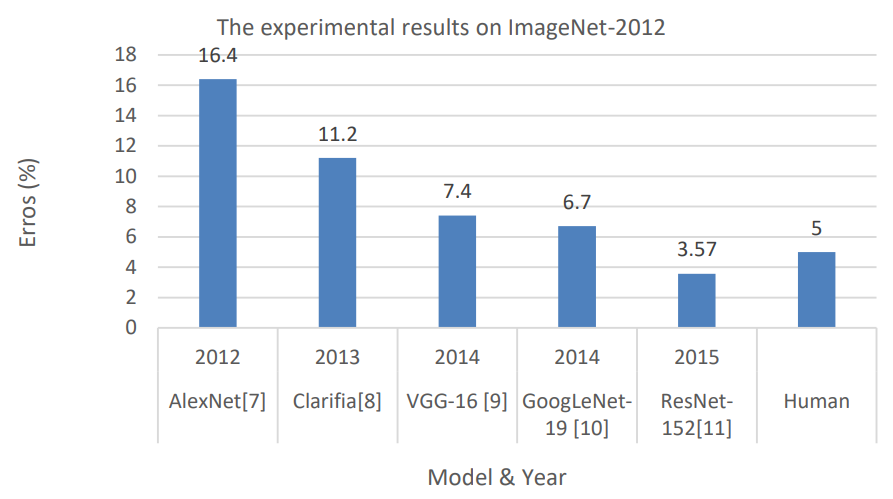
The modern-day **game-changers** spurred on by the **Annual ImageNet Large Scale Visual Recognition Challenge (ILSVRC).**
Source: [anyconnect.com](https://anyconnect.com/blog/the-history-of-facial-recognition-technologies)
In 2012, **AlexNet**, which was a **deep convolutional neural net (CNN)** bested that result by getting an error rate of **15.3%**. This was a game-changer because it was the first time that such results were achieved.
Subsequent image processing solutions in the following years improved on results of **AlexNet**. In 2014, **GooLeNet/Inception** achieved an error rate of **6.67%**. In 2015, **ResNet** further brought the error rate down to **3.6%**.
***
# Introduction
## 1\. What do we mean by ML-Ops?
The process of integrating the tools and concepts of **DevOps** for solving the problems faced while **training Machine Learning Models**, by **automatic adjustment of the Hyper-parameters,** leading to **increased accuracy**, is the **fundamental concept** behind **ML-Ops**.
The most important factor from **DevOps**, i.e. a focus on **Continuous Integration/Continuous Delivery** **(CI/CD)** is applied directly to **model generation**, while **regular deployment**, **diagnostics** and **further training** can also be done on a frequent process, rather than **waiting for one large upload at much slower intervals**.
### Check out this great Article to know more
[https://neptune.ai/blog/mlops-what-it-is-why-it-matters-and-how-to-implement-it-from-a-data-scientist-perspective](Know More)
## 2\. Transfer-Learning in the world of CNN
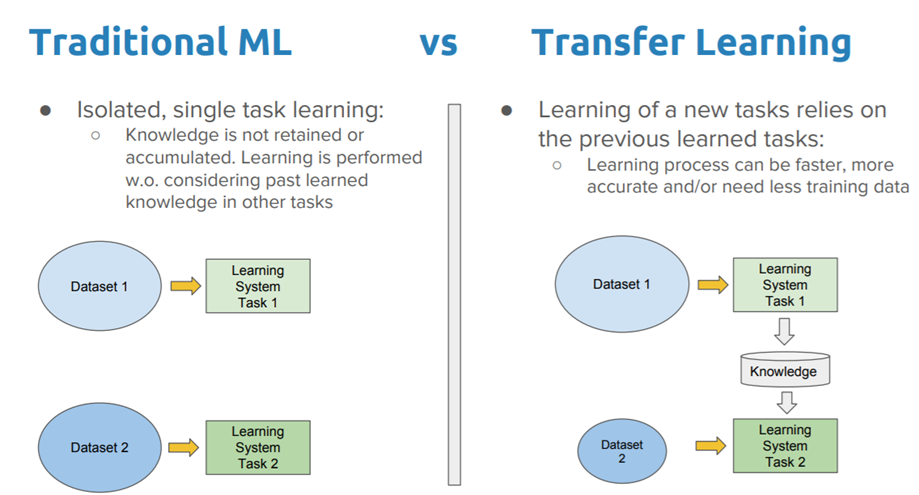
It is a machine learning method where a model developed for **a task is reused as the starting point for a model on a second task**.
It is a **popular approach in deep learning** where **pre-trained models are used as the starting point** on **Computer Vision(CV)** and **Natural Language Processing(NLP)** tasks are given the **vast compute and time resources required to develop neural network models** on these problems.
Source: [towardsdatascience.com](https://towardsdatascience.com/what-is-transfer-learning-8b1a0fa42b4)
**This method can give high accuracy with limited images and resources.**
* * *
# Synopsis
This project explains the process of automating the task of adjusting the Hyper-parameters of our Face Recognition Model, for attaining the perfect accuracy using Docker, Jenkins and Git/GitHub.
# Briefing about the Face Recognition model
The Face Recognition model is built using the method of **Transfer Learning**. **VGG16** pre-trained model is used for the purpose.
The possible **Hyper-parameter Tunings** here:
★ Adjusting the number of `FC layers`
★ Adjusting the `Learning Rate`
★ Choosing an `optimizer` and a `loss function`
★ Deciding on the `batch size` and `number of epochs`
The Code for the Face Recognition model can be downloaded from [here](https://github.com/Lucifergene/Face-Recognition-with-Transfer-Learning).
Video Demonstration of the Model
# Pre-requisites
First of all, we are assuming that **Docker**, **Git**, and **Jenkins with the Git Plugin** are installed in the system.
In this article, we are directly beginning with integrating our Face Recognition Model with DevOps tools.
In this article, we are going to **RHEL 8.2** as our Host OS.
* * *
# Getting Started
We are going to use **Docker containers** to build and **run our Machine Learning Models**. Different **custom Docker containers** will be built using the **DockerFile** to support different architectures of the ML models.
Through **Jenkins**, we are going to create multiple jobs as follows:
**JOB#1:** Pulling the Github repository automatically when some developers push the repository to Github.
**JOB#2:** By looking at the code or program file, Jenkins will automatically start the respective image containers to deploy code and start training.
( eg. If code uses **CNN**, then Jenkins should start the container that has already installed all the software required for the **CNN** processing)
**JOB#3:**Training the model and predicting the accuracy or metrics.
**JOB#4:** If the Metrics Accuracy is less than **90%**, then tweaking the machine learning model architecture.
**JOB#5:** Retraining the model and notifying that the best model is being created.
**JOB#6:(Monitoring)** If container where the app is running, fails due to any reason then this job will automatically start the container again from the last trained model.
# 1\. Setting up the Docker Containers
We are going to create 3 Docker containers for serving different ML models.
✓ CNN model
✓ ANN model
✓ Linear/Logistic Regression Models
## 1.1\. Setting up the Docker container for CNN and ANN models
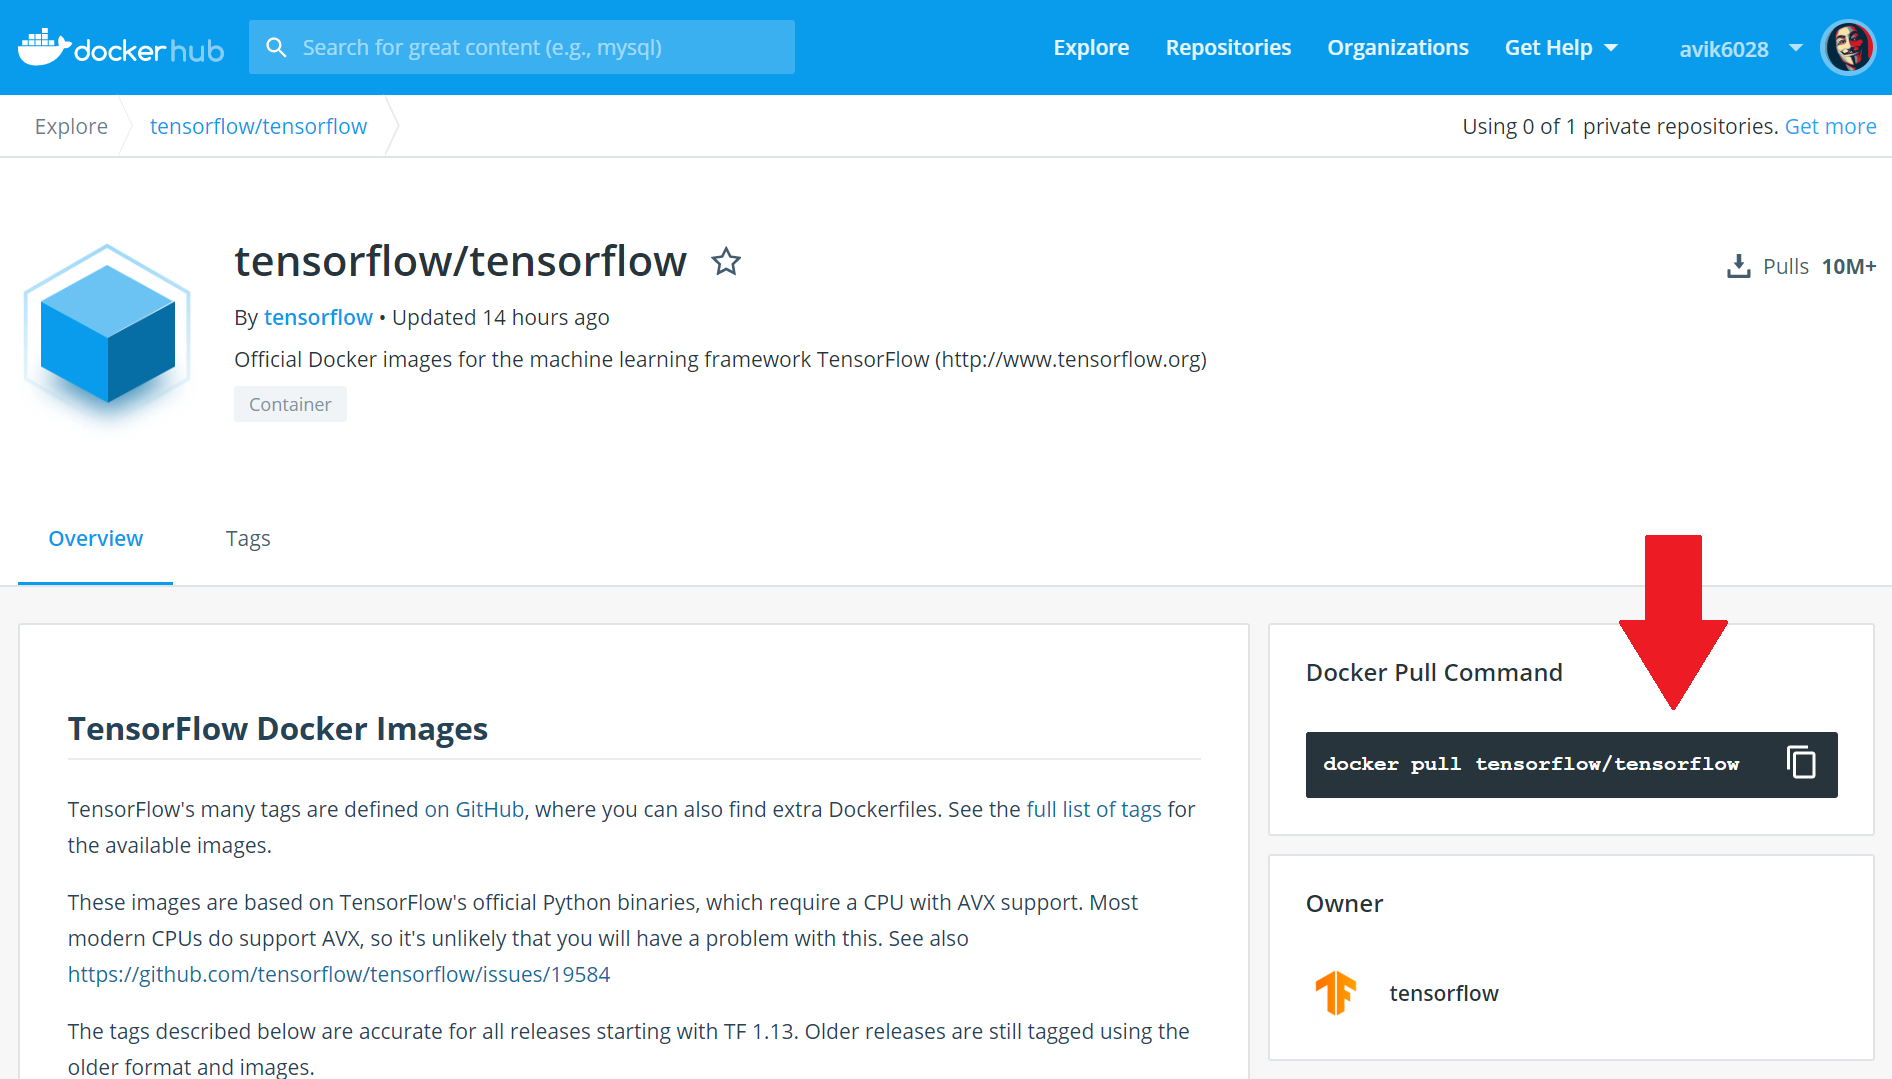
For setting up this container, we are going to use the `tensorflow/tensorflow` image from DockerHub.
To download the image to our local machine, we have to run the following command from the Command Line:
`docker pull tensorflow/tensorflow`
After installing the image, we need to modify the image so that we can run our CNN & ANN models in the container. We will be using Dockerfile to build our custom image.
To create the custom image, we need to create an empty file named `Dockerfile` anywhere in our host machine.
The contents of the Dockerfile will be as follows:
```
FROM tensorflow/tensorflow:latest
RUN pip3 install keras -y &&\
pip3 install numpy -y &&\
pip3 install pandas -y &&\
pip3 install pillow -y &&\
pip3 install scikit-learn -y &&\
```
After making the `Dockerfile` we need to build it to create our image using:
`docker build -t cnn_image:v1 .` (from the same folder)
This would create our custom `cnn_image` image in the local machine.
## 1.2\. Docker container for Linear/Logistic Regression Models
For setting up this container, we are going to use the `centos` image from DockerHub.
To download the image to our local machine, we have to run the following command from the Command Line:
`docker pull centos`
After installing the image, we need to modify the image so that we can run our Linear/Logistic Regression Models in the container. We will be using Dockerfile to build our custom image.
To create the custom image, we need to create an empty file named `Dockerfile` anywhere in our host machine.
The contents of the Dockerfile will be as follows:
```
FROM centos:latest
RUN yum install epel-release -y &&\
yum update -y &&\
yum install python36 -y &&\
pip3 install scikit-learn -y &&\
pip3 install numpy -y &&\
pip3 install pandas -y &&\
pip3 install matplotlib -y &&\
pip3 install pillow -y &&\
yum update -y
```
After making the `Dockerfile` we need to build it to create our image using:
`docker build -t regression_image:v1 .` (from the same folder)
This would create our custom `regression_image` image in the local machine.
★ Thus we have successfully set up the Docker containers in our system. ★
**To verify the installation of Docker images we can check the list of all images installed in our local machine**: `docker image ls`
* * *
# 2\. Building the Jenkins Pipeline
## 2.1\. Job-1: Automatic Code Download
Before downloading the code, we need to create some folders on our local machine which would act as **volumes** for the **Docker containers**.
To create the folders in our local machine:
```
mkdir /root/Desktop/ml_models
cd /root/Desktop/ml_models/
mkdir cnn ann reg
```
First, the downloaded codes would be copied in the `ml_models` directory.
For creating the Job for downloading codes:
1. Select `new item` option from the Jenkins menu.
2. Assign a name to the Job ( eg. **model_download** )and select it to be a `Freestyle` project.
3. From the `Configure Job` option, we set the configurations.
4. From the **Source Code Management** section, we select Git and mention the URL of our GitHub Repository and select the branch as `master`.
5. In the **Build Triggers** section, we select `Poll SCM` and set the value to `* * * * *`.
**This means that the Job would check any code change from GitHub every minute.**
6. In the Build Section, we type the following script: `sudo cp -v -r -f * /root/Desktop/ml_models`**This command would copy all the content downloaded from the GitHub master branch to the specified folder for deployment.**
7. On clicking the **Save** option, we add the Job to our Job List.
On coming back to the Job List page, we can see the **Job** is being built. If the colour of the ball turns **blue**, it means the Job has been successfully executed. If the colour changes to **red**, it means there has been some error in between. We can see the console output to check the error.
**Till now, we have successfully downloaded the codes from GitHub to our Server System automatically.**
## 2.2\. Job-2: Classifying the files based on the architecture of the model
Once the files have been downloaded, we need to copy the files to their respective folders automatically.
For creating the Job for classifying the files:
1. Select `new item` option from the Jenkins menu.
2. Assign a name to the Job ( eg. **model_classification** )and select it to be a `Freestyle` project.
3. From the `Configure Job` option, we set the configurations.
4. From the **Build Triggers** section, we select `Build after other projects are built` and mention `model_download` as the project to watch. This is called a **DownStreaming Job**.
5. In the **Build** Section, we type the following script:
6\. On clicking the **Save** option, we add the Job to our Job List.
**Thus, we have successfully transferred the files to their respective folders. Also, we have set these folders as volumes of the Docker Containers and started the service.**
## 2.3\. Job-3: Training the model and predicting the accuracy or metrics
Now, we have to start training the model already loaded to the respective Docker container.
For creating the Job for Training the model:
1. Select `new item` option from the Jenkins menu.
2. Assign a name to the Job ( eg. **model_training** )and select it to be a `Freestyle` project.
3. From the `Configure Job` option, we set the configurations.
4. From the **Build Triggers** section, we select `Build after other projects are built` and mention `model_classification` as the project to watch. This is called a **DownStreaming Job**.
5. In the **Build** Section, we type the following script:
6\. On clicking the **Save** option, we add the Job to our Job List.
**By the end of this job, we have downloaded, classified and trained the model. We have also found out the accuracy of the model after training.**
**For this project, we are setting 90% as the needed Accuracy for the project.**
Now, **if we find the accuracy obtained is not sufficient**, we have to do the Hyper-parameter tuning. **This would start the Job-4**.
Otherwise, **a mail would be sent to the user stating the Desired accuracy** has been reached. **This would be done by Job-5**.
## 2.4\. Job-4: Retraining the model to increase the Accuracy
Suppose, after training the model, we find out the accuracy is below the desired amount. Thus, we have to adjust the **hyper-parameters** for **increasing the accuracy of the models**.
**This is where DevOps steps in**. With the help of **Continuous Integration Pipeline (CI Pipeline)**, we can automate the **process of Hyper-parameter tuning**. Thus the work which would require a lot of days if done manually can be **finished within a few hours** without much human intervention.
**Note:** After training and testing our Face Recognition model locally, it has been found out that adding some **extra Fully Connected Layers (FC Layer)**, increases the accuracy beyond our desired mark.
**Thus we are focussing on adjusting a single hyperparameter for this article.** Later on, we can easily add the function of checking other hyperparameters, **if a specific model demands one**.
For creating the Job for Retraining the model:
1. Select `new item` option from the Jenkins menu.
2. Assign a name to the Job ( eg. **model_retrain**)and select it to be a `Freestyle` project.
3. From the **Configure Job** option, we set the configurations.
4. From the **Build Triggers** section, we select **Trigger builds remotely** an option.
5. Provide an **Authentication Token**
6. In the **Build** Section, we type the following script:
7\. On clicking the **Save** option, we add the Job to our Job List.
Thus, the Job has been setup. To Trigger the Build, the following command would run the job:
`curl --user ":" JENKINS_URL/view/Mlops-project-1/job/model_retrain/build?token=TOKEN_NAME`
e.g. `curl --user "admin:admin" http://192.123.32.2932:8080/view/Mlops-project-1/job/model_retrain/build?token=retraining_model`
## 2.5\. Job-5: Notifying that the best model is being created
If the trained model gives the desired accuracy at the beginning or by Hyper-parameter tuning, a mail is automatically sent to the user confirming the action.
For creating the Job for Notifying that the best model is being created:
1. Select `new item` option from the Jenkins menu.
2. Assign a name to the Job ( eg. **model_notify**)and select it to be a `Freestyle` project.
3. From the **Configure Job** option, we set the configurations.
4. From the **Build Triggers** section, we select **Trigger builds remotely** an option.
5. Provide an **Authentication Token**
6. In the **Build** Section, we type the following script:
```
sudo cp -rf /root/Desktop/ml_models/ *
sudo python3 sendmail.py
```
7\. On clicking the **Save** option, we add the Job to our Job List.
Thus, the Job has been setup. To Trigger the Build, the following command would run the job:
`curl --user ":" JENKINS_URL/view/Mlops-project-1/job/model_notify/build?token=TOKEN_NAME`
e.g. `curl --user "admin:admin" http://192.123.32.2932:8080/view/Mlops-project-1/job/model_notify/build?token=model_notification`
* * *
Now, we have to **introduce these remote triggers** we have created in our Model file. For that, at the end of the code, **we add a conditional statement**:
## 2.5\. Job-6: Additional **Monitoring Job**
If the container where the app is running, fails due to any reason then this job will automatically start the container again from the last trained model.
For monitoring the Jobs created:
1. Select a **new item** option from the Jenkins menu.
2. Assign a name to the Job ( eg. **monitor_job** )and select it to be a **Freestyle** project.
3. From the **Configure Job** option, we set the configurations.
4. From the **Build Triggers** section, we select `Build after other projects are built` and mention `model_train` & `model_retrain` as the project to watch.
It is important to **select “Trigger even if the build fails” option** from the drop-down list.
5\. In the **Build** Section, we type the following script:
6\. From the **Post Build Actions** dropdown, we select “**Build Other Projects**” and mention `model_train` as the project to build.
7\. On clicking the **Save** option, we add the Job to our Job List.
**Therefore, whenever a container stops due to some problems during training the model, Jobs#3 & Jobs#4 would fail. This would trigger this Job#6 to restart the containers and again start Job#3.**
* * *
# Understanding the Complete Workflow properly
When a user adds a new model in the connected GitHub account,
★ Jenkins would download the code into the local system.
★ Once the code is received, **Job#2** would **classify the model** and add it to the **respective folder** and **attach the folder as the volume** of the D**ocker Container**.
**★ Job#3** would execute the file inside the **Docker container** and **train** the model and **predict the accuracy or metrics**.
★ Now, if the accuracy is below the desired, **Job#4** would run. It would **retrain the model by changing the hyper-parameters**.
★ Once the accuracy becomes greater than the desired, **Job#5** will be fired, resulting in the **automatic sending of an e-mail** to the Developer.
★ At last, **Job#6** is set as a **Monitoring Job**. It would continuously check whether the container crashes during training and would restart them.
* * *
# Conclusion
Previously, we had an additional **3 Dense layers** attached to the pre-trained model of **VGG16**. We came to an accuracy of **86%**.
After **running this Pipeline**, **2 more layers were added** at the end through these automation tools, due to which the **accuracy touched 92%**.
This method of **Automated Hyperparameter Tuning** would help in adjusting the accuracy of Machine Learning models faster and efficiently. This is the main reason for using the **power of ML-Ops** to solve these real-life situations.
* * *
You can reach out on my [Twitter](https://twitter.com/avik6028), [Instagram](https://instagram.com/avik6028), or on [LinkedIn](https://linkedin.com/in/avik-kundu-0b837715b) if you need more help. I would be more than happy.
**Good Luck** 😎 and **happy coding** 👨💻
 Source: [anyconnect.com](https://anyconnect.com/blog/the-history-of-facial-recognition-technologies)
In 2012, **AlexNet**, which was a **deep convolutional neural net (CNN)** bested that result by getting an error rate of **15.3%**. This was a game-changer because it was the first time that such results were achieved.
Subsequent image processing solutions in the following years improved on results of **AlexNet**. In 2014, **GooLeNet/Inception** achieved an error rate of **6.67%**. In 2015, **ResNet** further brought the error rate down to **3.6%**.
***
# Introduction
## 1\. What do we mean by ML-Ops?
The process of integrating the tools and concepts of **DevOps** for solving the problems faced while **training Machine Learning Models**, by **automatic adjustment of the Hyper-parameters,** leading to **increased accuracy**, is the **fundamental concept** behind **ML-Ops**.
The most important factor from **DevOps**, i.e. a focus on **Continuous Integration/Continuous Delivery** **(CI/CD)** is applied directly to **model generation**, while **regular deployment**, **diagnostics** and **further training** can also be done on a frequent process, rather than **waiting for one large upload at much slower intervals**.
### Check out this great Article to know more
[https://neptune.ai/blog/mlops-what-it-is-why-it-matters-and-how-to-implement-it-from-a-data-scientist-perspective](Know More)
## 2\. Transfer-Learning in the world of CNN
It is a machine learning method where a model developed for **a task is reused as the starting point for a model on a second task**.
It is a **popular approach in deep learning** where **pre-trained models are used as the starting point** on **Computer Vision(CV)** and **Natural Language Processing(NLP)** tasks are given the **vast compute and time resources required to develop neural network models** on these problems.
Source: [anyconnect.com](https://anyconnect.com/blog/the-history-of-facial-recognition-technologies)
In 2012, **AlexNet**, which was a **deep convolutional neural net (CNN)** bested that result by getting an error rate of **15.3%**. This was a game-changer because it was the first time that such results were achieved.
Subsequent image processing solutions in the following years improved on results of **AlexNet**. In 2014, **GooLeNet/Inception** achieved an error rate of **6.67%**. In 2015, **ResNet** further brought the error rate down to **3.6%**.
***
# Introduction
## 1\. What do we mean by ML-Ops?
The process of integrating the tools and concepts of **DevOps** for solving the problems faced while **training Machine Learning Models**, by **automatic adjustment of the Hyper-parameters,** leading to **increased accuracy**, is the **fundamental concept** behind **ML-Ops**.
The most important factor from **DevOps**, i.e. a focus on **Continuous Integration/Continuous Delivery** **(CI/CD)** is applied directly to **model generation**, while **regular deployment**, **diagnostics** and **further training** can also be done on a frequent process, rather than **waiting for one large upload at much slower intervals**.
### Check out this great Article to know more
[https://neptune.ai/blog/mlops-what-it-is-why-it-matters-and-how-to-implement-it-from-a-data-scientist-perspective](Know More)
## 2\. Transfer-Learning in the world of CNN
It is a machine learning method where a model developed for **a task is reused as the starting point for a model on a second task**.
It is a **popular approach in deep learning** where **pre-trained models are used as the starting point** on **Computer Vision(CV)** and **Natural Language Processing(NLP)** tasks are given the **vast compute and time resources required to develop neural network models** on these problems.
 Source: [towardsdatascience.com](https://towardsdatascience.com/what-is-transfer-learning-8b1a0fa42b4)
**This method can give high accuracy with limited images and resources.**
* * *
# Synopsis
This project explains the process of automating the task of adjusting the Hyper-parameters of our Face Recognition Model, for attaining the perfect accuracy using Docker, Jenkins and Git/GitHub.
# Briefing about the Face Recognition model
The Face Recognition model is built using the method of **Transfer Learning**. **VGG16** pre-trained model is used for the purpose.
The possible **Hyper-parameter Tunings** here:
★ Adjusting the number of `FC layers`
★ Adjusting the `Learning Rate`
★ Choosing an `optimizer` and a `loss function`
★ Deciding on the `batch size` and `number of epochs`
The Code for the Face Recognition model can be downloaded from [here](https://github.com/Lucifergene/Face-Recognition-with-Transfer-Learning).
Video Demonstration of the Model
# Pre-requisites
First of all, we are assuming that **Docker**, **Git**, and **Jenkins with the Git Plugin** are installed in the system.
In this article, we are directly beginning with integrating our Face Recognition Model with DevOps tools.
In this article, we are going to **RHEL 8.2** as our Host OS.
* * *
# Getting Started
We are going to use **Docker containers** to build and **run our Machine Learning Models**. Different **custom Docker containers** will be built using the **DockerFile** to support different architectures of the ML models.
Through **Jenkins**, we are going to create multiple jobs as follows:
**JOB#1:** Pulling the Github repository automatically when some developers push the repository to Github.
**JOB#2:** By looking at the code or program file, Jenkins will automatically start the respective image containers to deploy code and start training.
( eg. If code uses **CNN**, then Jenkins should start the container that has already installed all the software required for the **CNN** processing)
**JOB#3:**Training the model and predicting the accuracy or metrics.
**JOB#4:** If the Metrics Accuracy is less than **90%**, then tweaking the machine learning model architecture.
**JOB#5:** Retraining the model and notifying that the best model is being created.
**JOB#6:(Monitoring)** If container where the app is running, fails due to any reason then this job will automatically start the container again from the last trained model.
# 1\. Setting up the Docker Containers
We are going to create 3 Docker containers for serving different ML models.
✓ CNN model
✓ ANN model
✓ Linear/Logistic Regression Models
## 1.1\. Setting up the Docker container for CNN and ANN models
For setting up this container, we are going to use the `tensorflow/tensorflow` image from DockerHub.
Source: [towardsdatascience.com](https://towardsdatascience.com/what-is-transfer-learning-8b1a0fa42b4)
**This method can give high accuracy with limited images and resources.**
* * *
# Synopsis
This project explains the process of automating the task of adjusting the Hyper-parameters of our Face Recognition Model, for attaining the perfect accuracy using Docker, Jenkins and Git/GitHub.
# Briefing about the Face Recognition model
The Face Recognition model is built using the method of **Transfer Learning**. **VGG16** pre-trained model is used for the purpose.
The possible **Hyper-parameter Tunings** here:
★ Adjusting the number of `FC layers`
★ Adjusting the `Learning Rate`
★ Choosing an `optimizer` and a `loss function`
★ Deciding on the `batch size` and `number of epochs`
The Code for the Face Recognition model can be downloaded from [here](https://github.com/Lucifergene/Face-Recognition-with-Transfer-Learning).
Video Demonstration of the Model
# Pre-requisites
First of all, we are assuming that **Docker**, **Git**, and **Jenkins with the Git Plugin** are installed in the system.
In this article, we are directly beginning with integrating our Face Recognition Model with DevOps tools.
In this article, we are going to **RHEL 8.2** as our Host OS.
* * *
# Getting Started
We are going to use **Docker containers** to build and **run our Machine Learning Models**. Different **custom Docker containers** will be built using the **DockerFile** to support different architectures of the ML models.
Through **Jenkins**, we are going to create multiple jobs as follows:
**JOB#1:** Pulling the Github repository automatically when some developers push the repository to Github.
**JOB#2:** By looking at the code or program file, Jenkins will automatically start the respective image containers to deploy code and start training.
( eg. If code uses **CNN**, then Jenkins should start the container that has already installed all the software required for the **CNN** processing)
**JOB#3:**Training the model and predicting the accuracy or metrics.
**JOB#4:** If the Metrics Accuracy is less than **90%**, then tweaking the machine learning model architecture.
**JOB#5:** Retraining the model and notifying that the best model is being created.
**JOB#6:(Monitoring)** If container where the app is running, fails due to any reason then this job will automatically start the container again from the last trained model.
# 1\. Setting up the Docker Containers
We are going to create 3 Docker containers for serving different ML models.
✓ CNN model
✓ ANN model
✓ Linear/Logistic Regression Models
## 1.1\. Setting up the Docker container for CNN and ANN models
For setting up this container, we are going to use the `tensorflow/tensorflow` image from DockerHub.
 To download the image to our local machine, we have to run the following command from the Command Line:
`docker pull tensorflow/tensorflow`
After installing the image, we need to modify the image so that we can run our CNN & ANN models in the container. We will be using Dockerfile to build our custom image.
To create the custom image, we need to create an empty file named `Dockerfile` anywhere in our host machine.
The contents of the Dockerfile will be as follows:
```
FROM tensorflow/tensorflow:latest
RUN pip3 install keras -y &&\
pip3 install numpy -y &&\
pip3 install pandas -y &&\
pip3 install pillow -y &&\
pip3 install scikit-learn -y &&\
```
After making the `Dockerfile` we need to build it to create our image using:
`docker build -t cnn_image:v1 .` (from the same folder)
This would create our custom `cnn_image` image in the local machine.
## 1.2\. Docker container for Linear/Logistic Regression Models
For setting up this container, we are going to use the `centos` image from DockerHub.
To download the image to our local machine, we have to run the following command from the Command Line:
`docker pull tensorflow/tensorflow`
After installing the image, we need to modify the image so that we can run our CNN & ANN models in the container. We will be using Dockerfile to build our custom image.
To create the custom image, we need to create an empty file named `Dockerfile` anywhere in our host machine.
The contents of the Dockerfile will be as follows:
```
FROM tensorflow/tensorflow:latest
RUN pip3 install keras -y &&\
pip3 install numpy -y &&\
pip3 install pandas -y &&\
pip3 install pillow -y &&\
pip3 install scikit-learn -y &&\
```
After making the `Dockerfile` we need to build it to create our image using:
`docker build -t cnn_image:v1 .` (from the same folder)
This would create our custom `cnn_image` image in the local machine.
## 1.2\. Docker container for Linear/Logistic Regression Models
For setting up this container, we are going to use the `centos` image from DockerHub.
 To download the image to our local machine, we have to run the following command from the Command Line:
`docker pull centos`
After installing the image, we need to modify the image so that we can run our Linear/Logistic Regression Models in the container. We will be using Dockerfile to build our custom image.
To create the custom image, we need to create an empty file named `Dockerfile` anywhere in our host machine.
The contents of the Dockerfile will be as follows:
```
FROM centos:latest
RUN yum install epel-release -y &&\
yum update -y &&\
yum install python36 -y &&\
pip3 install scikit-learn -y &&\
pip3 install numpy -y &&\
pip3 install pandas -y &&\
pip3 install matplotlib -y &&\
pip3 install pillow -y &&\
yum update -y
```
After making the `Dockerfile` we need to build it to create our image using:
`docker build -t regression_image:v1 .` (from the same folder)
This would create our custom `regression_image` image in the local machine.
★ Thus we have successfully set up the Docker containers in our system. ★
**To verify the installation of Docker images we can check the list of all images installed in our local machine**: `docker image ls`
* * *
# 2\. Building the Jenkins Pipeline
## 2.1\. Job-1: Automatic Code Download
Before downloading the code, we need to create some folders on our local machine which would act as **volumes** for the **Docker containers**.
To create the folders in our local machine:
```
mkdir /root/Desktop/ml_models
cd /root/Desktop/ml_models/
mkdir cnn ann reg
```
First, the downloaded codes would be copied in the `ml_models` directory.
For creating the Job for downloading codes:
1. Select `new item` option from the Jenkins menu.
2. Assign a name to the Job ( eg. **model_download** )and select it to be a `Freestyle` project.
3. From the `Configure Job` option, we set the configurations.
4. From the **Source Code Management** section, we select Git and mention the URL of our GitHub Repository and select the branch as `master`.
5. In the **Build Triggers** section, we select `Poll SCM` and set the value to `* * * * *`.
**This means that the Job would check any code change from GitHub every minute.**
6. In the Build Section, we type the following script: `sudo cp -v -r -f * /root/Desktop/ml_models`**This command would copy all the content downloaded from the GitHub master branch to the specified folder for deployment.**
7. On clicking the **Save** option, we add the Job to our Job List.
On coming back to the Job List page, we can see the **Job** is being built. If the colour of the ball turns **blue**, it means the Job has been successfully executed. If the colour changes to **red**, it means there has been some error in between. We can see the console output to check the error.
**Till now, we have successfully downloaded the codes from GitHub to our Server System automatically.**
## 2.2\. Job-2: Classifying the files based on the architecture of the model
Once the files have been downloaded, we need to copy the files to their respective folders automatically.
For creating the Job for classifying the files:
1. Select `new item` option from the Jenkins menu.
2. Assign a name to the Job ( eg. **model_classification** )and select it to be a `Freestyle` project.
3. From the `Configure Job` option, we set the configurations.
4. From the **Build Triggers** section, we select `Build after other projects are built` and mention `model_download` as the project to watch. This is called a **DownStreaming Job**.
5. In the **Build** Section, we type the following script:
6\. On clicking the **Save** option, we add the Job to our Job List.
**Thus, we have successfully transferred the files to their respective folders. Also, we have set these folders as volumes of the Docker Containers and started the service.**
## 2.3\. Job-3: Training the model and predicting the accuracy or metrics
Now, we have to start training the model already loaded to the respective Docker container.
For creating the Job for Training the model:
1. Select `new item` option from the Jenkins menu.
2. Assign a name to the Job ( eg. **model_training** )and select it to be a `Freestyle` project.
3. From the `Configure Job` option, we set the configurations.
4. From the **Build Triggers** section, we select `Build after other projects are built` and mention `model_classification` as the project to watch. This is called a **DownStreaming Job**.
5. In the **Build** Section, we type the following script:
6\. On clicking the **Save** option, we add the Job to our Job List.
**By the end of this job, we have downloaded, classified and trained the model. We have also found out the accuracy of the model after training.**
**For this project, we are setting 90% as the needed Accuracy for the project.**
Now, **if we find the accuracy obtained is not sufficient**, we have to do the Hyper-parameter tuning. **This would start the Job-4**.
Otherwise, **a mail would be sent to the user stating the Desired accuracy** has been reached. **This would be done by Job-5**.
## 2.4\. Job-4: Retraining the model to increase the Accuracy
Suppose, after training the model, we find out the accuracy is below the desired amount. Thus, we have to adjust the **hyper-parameters** for **increasing the accuracy of the models**.
**This is where DevOps steps in**. With the help of **Continuous Integration Pipeline (CI Pipeline)**, we can automate the **process of Hyper-parameter tuning**. Thus the work which would require a lot of days if done manually can be **finished within a few hours** without much human intervention.
**Note:** After training and testing our Face Recognition model locally, it has been found out that adding some **extra Fully Connected Layers (FC Layer)**, increases the accuracy beyond our desired mark.
**Thus we are focussing on adjusting a single hyperparameter for this article.** Later on, we can easily add the function of checking other hyperparameters, **if a specific model demands one**.
For creating the Job for Retraining the model:
1. Select `new item` option from the Jenkins menu.
2. Assign a name to the Job ( eg. **model_retrain**)and select it to be a `Freestyle` project.
3. From the **Configure Job** option, we set the configurations.
4. From the **Build Triggers** section, we select **Trigger builds remotely** an option.
5. Provide an **Authentication Token**
6. In the **Build** Section, we type the following script:
7\. On clicking the **Save** option, we add the Job to our Job List.
Thus, the Job has been setup. To Trigger the Build, the following command would run the job:
`curl --user "
To download the image to our local machine, we have to run the following command from the Command Line:
`docker pull centos`
After installing the image, we need to modify the image so that we can run our Linear/Logistic Regression Models in the container. We will be using Dockerfile to build our custom image.
To create the custom image, we need to create an empty file named `Dockerfile` anywhere in our host machine.
The contents of the Dockerfile will be as follows:
```
FROM centos:latest
RUN yum install epel-release -y &&\
yum update -y &&\
yum install python36 -y &&\
pip3 install scikit-learn -y &&\
pip3 install numpy -y &&\
pip3 install pandas -y &&\
pip3 install matplotlib -y &&\
pip3 install pillow -y &&\
yum update -y
```
After making the `Dockerfile` we need to build it to create our image using:
`docker build -t regression_image:v1 .` (from the same folder)
This would create our custom `regression_image` image in the local machine.
★ Thus we have successfully set up the Docker containers in our system. ★
**To verify the installation of Docker images we can check the list of all images installed in our local machine**: `docker image ls`
* * *
# 2\. Building the Jenkins Pipeline
## 2.1\. Job-1: Automatic Code Download
Before downloading the code, we need to create some folders on our local machine which would act as **volumes** for the **Docker containers**.
To create the folders in our local machine:
```
mkdir /root/Desktop/ml_models
cd /root/Desktop/ml_models/
mkdir cnn ann reg
```
First, the downloaded codes would be copied in the `ml_models` directory.
For creating the Job for downloading codes:
1. Select `new item` option from the Jenkins menu.
2. Assign a name to the Job ( eg. **model_download** )and select it to be a `Freestyle` project.
3. From the `Configure Job` option, we set the configurations.
4. From the **Source Code Management** section, we select Git and mention the URL of our GitHub Repository and select the branch as `master`.
5. In the **Build Triggers** section, we select `Poll SCM` and set the value to `* * * * *`.
**This means that the Job would check any code change from GitHub every minute.**
6. In the Build Section, we type the following script: `sudo cp -v -r -f * /root/Desktop/ml_models`**This command would copy all the content downloaded from the GitHub master branch to the specified folder for deployment.**
7. On clicking the **Save** option, we add the Job to our Job List.
On coming back to the Job List page, we can see the **Job** is being built. If the colour of the ball turns **blue**, it means the Job has been successfully executed. If the colour changes to **red**, it means there has been some error in between. We can see the console output to check the error.
**Till now, we have successfully downloaded the codes from GitHub to our Server System automatically.**
## 2.2\. Job-2: Classifying the files based on the architecture of the model
Once the files have been downloaded, we need to copy the files to their respective folders automatically.
For creating the Job for classifying the files:
1. Select `new item` option from the Jenkins menu.
2. Assign a name to the Job ( eg. **model_classification** )and select it to be a `Freestyle` project.
3. From the `Configure Job` option, we set the configurations.
4. From the **Build Triggers** section, we select `Build after other projects are built` and mention `model_download` as the project to watch. This is called a **DownStreaming Job**.
5. In the **Build** Section, we type the following script:
6\. On clicking the **Save** option, we add the Job to our Job List.
**Thus, we have successfully transferred the files to their respective folders. Also, we have set these folders as volumes of the Docker Containers and started the service.**
## 2.3\. Job-3: Training the model and predicting the accuracy or metrics
Now, we have to start training the model already loaded to the respective Docker container.
For creating the Job for Training the model:
1. Select `new item` option from the Jenkins menu.
2. Assign a name to the Job ( eg. **model_training** )and select it to be a `Freestyle` project.
3. From the `Configure Job` option, we set the configurations.
4. From the **Build Triggers** section, we select `Build after other projects are built` and mention `model_classification` as the project to watch. This is called a **DownStreaming Job**.
5. In the **Build** Section, we type the following script:
6\. On clicking the **Save** option, we add the Job to our Job List.
**By the end of this job, we have downloaded, classified and trained the model. We have also found out the accuracy of the model after training.**
**For this project, we are setting 90% as the needed Accuracy for the project.**
Now, **if we find the accuracy obtained is not sufficient**, we have to do the Hyper-parameter tuning. **This would start the Job-4**.
Otherwise, **a mail would be sent to the user stating the Desired accuracy** has been reached. **This would be done by Job-5**.
## 2.4\. Job-4: Retraining the model to increase the Accuracy
Suppose, after training the model, we find out the accuracy is below the desired amount. Thus, we have to adjust the **hyper-parameters** for **increasing the accuracy of the models**.
**This is where DevOps steps in**. With the help of **Continuous Integration Pipeline (CI Pipeline)**, we can automate the **process of Hyper-parameter tuning**. Thus the work which would require a lot of days if done manually can be **finished within a few hours** without much human intervention.
**Note:** After training and testing our Face Recognition model locally, it has been found out that adding some **extra Fully Connected Layers (FC Layer)**, increases the accuracy beyond our desired mark.
**Thus we are focussing on adjusting a single hyperparameter for this article.** Later on, we can easily add the function of checking other hyperparameters, **if a specific model demands one**.
For creating the Job for Retraining the model:
1. Select `new item` option from the Jenkins menu.
2. Assign a name to the Job ( eg. **model_retrain**)and select it to be a `Freestyle` project.
3. From the **Configure Job** option, we set the configurations.
4. From the **Build Triggers** section, we select **Trigger builds remotely** an option.
5. Provide an **Authentication Token**
6. In the **Build** Section, we type the following script:
7\. On clicking the **Save** option, we add the Job to our Job List.
Thus, the Job has been setup. To Trigger the Build, the following command would run the job:
`curl --user "